
This website uses cookies to improve your experience. We\'ll assume you\'re ok with this, but you can opt-out if you wish. Read More
In case of sale of your personal information, you may opt out by using the link Do Not Sell My Personal Information
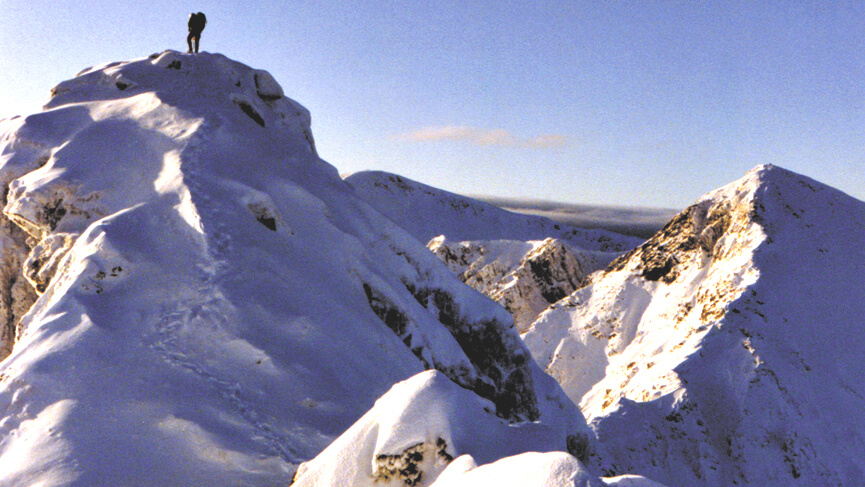
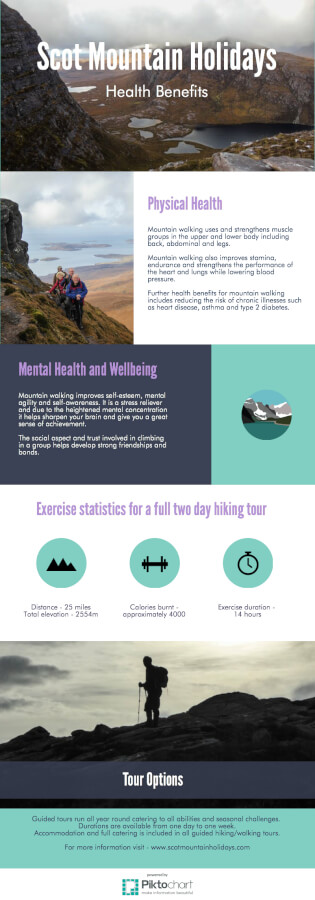
We’ve scheduled a new trip for winter 2024. We’re going to be based in Glencoe for a week in March bagging some tasty Munros. It’s a new venture for us so we’ve looked for some spectacular images to illustrate the trip. On a search of Flickr, we found John McSporran. John has kindly agreed not only to lend us some of his spectacular Glencoe images, but he’s also written a brief summary of why he personally finds Glencoe such a fascinating area to explore.
I first began photographing Glencoe about 20 years ago. It is one of those places where the weather is always changing, the light can be fantastic one minute and terrible the next. It can be mean and moody, mystical and magical, but always interesting and frequently awe inspiring. Even on horrible days, that fleeting moment when a beam of light strikes the mountains makes it all worth while.
About 10 years ago I realized that if I wanted the best photos of Glencoe I needed to get high. That’s when I began climbing its mountains. Then I realized that I needed to be ‘up top’ for sunrise and sunset (the golden hours). That’s when I climbed in the dark using a head torch. Then I began to camp out up top. Then I went ‘full on’ and climbed in the dark in mid winter using an ice axe and crampons – just for that one great photograph. Carrying 25 kilos / 55 lbs of camping and photography gear to the top of a mountain can be hard (particularly when in your late 50’s), but the experience of stunning sunrises and sunsets in Glencoe makes it all worth while.
I have met hundreds of people on the Scottish mountains, some I meet many times, some only once, but there is a community spirit amongst those who climb mountains, especially photographers – solitary committed people whose hard shell cracks as soon as we begin to swap stories.
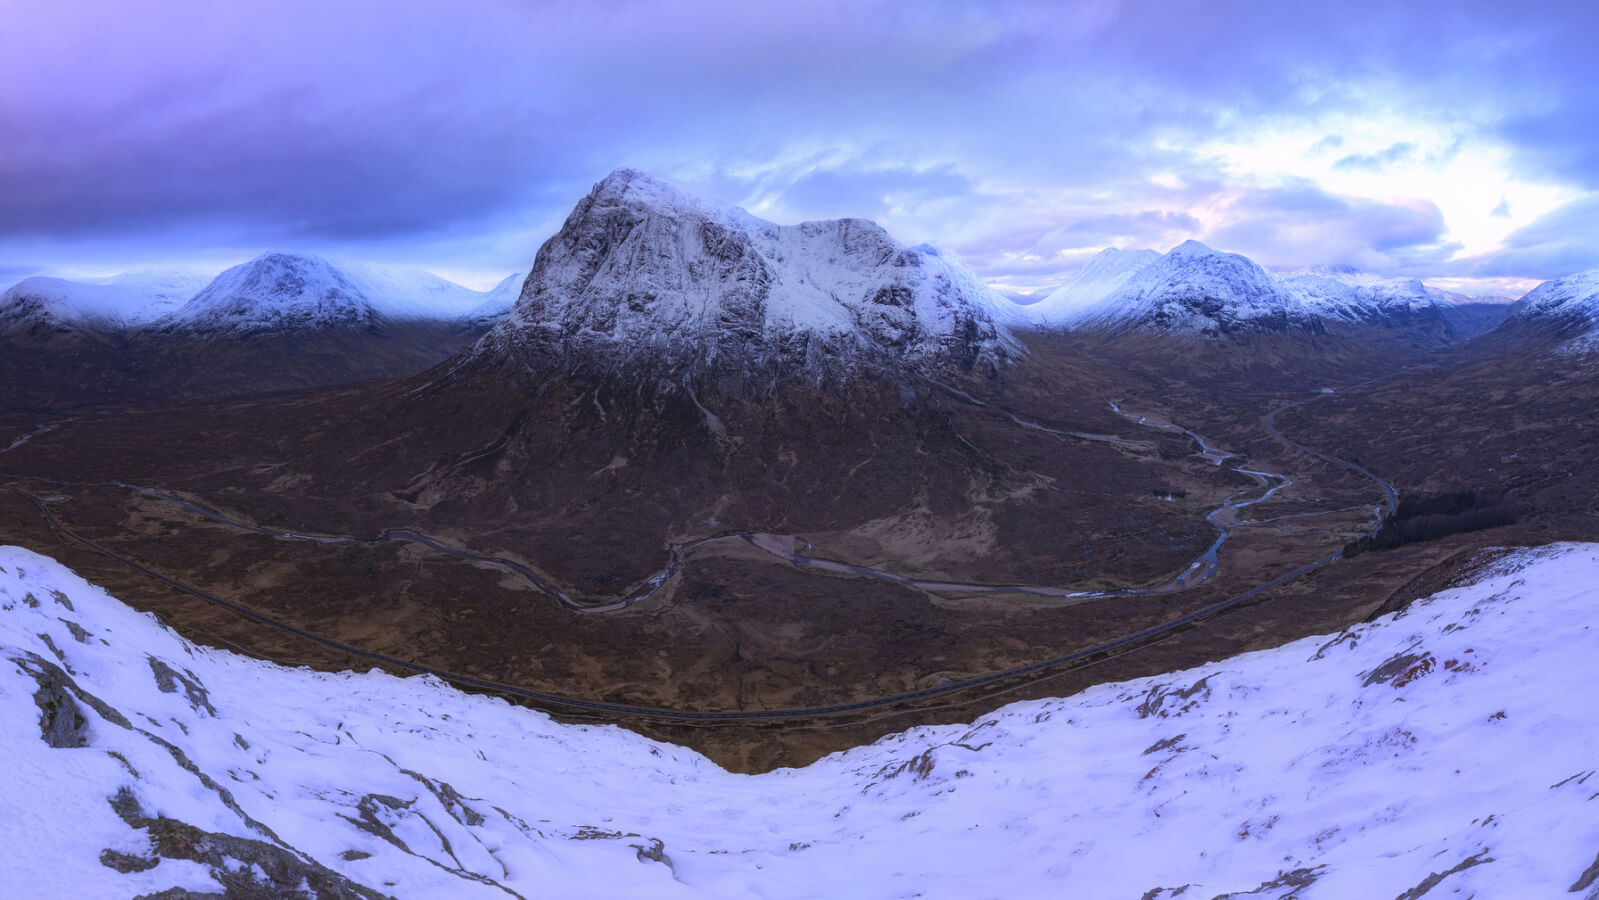
My favourite Glencoe mountains are Beinn a’Chrulaiste and Buachaille Etive Beag. They are not the hardest or the tallest, but they provide the best viewpoints and give sweeping panoramas of the others.

Other favourite locations are:
There are so many great locations, you are spoiled for choice.
We have a saying in Scotland – if you don’t like the weather, wait 15 minutes, it will change. I hope you enjoy your visit to Glencoe.
For more choices of walking holidays in Scotland, head over to our main holiday page
For more information on walking in the Highlands
Winter has descended upon the Scottish Highlands, the familiar hills evolve into awe-inspiring mountains, blanketed in a pristine coat of snow, setting the stage for a winter hiking experience like no other. The landscape, now a picturesque haven, invites adventurers to traverse its snow-laden trails, discovering a unique blend of tranquility and adventure. However, one must always keep an eye on the ever present dangers inherent in winter.
Winter hiking in the Highlands offers a striking contrast to other seasons. The once-green paths are now transformed into a pristine canvas of white, waiting to be explored. Intrepid hikers, armed with waterproof gear and insulated boots, embark on journeys that unveil the Highlands’ winter charm.
Traversing the snow-covered trails is a sensory delight. The crunch of snow beneath each step echoes through the valleys, and the brisk winter air invigorates the senses. The hills, now adorned with a glistening layer of frost, create a visual spectacle that adds an extra layer of magic to the hiking experience.
Never forget though that you need to be extra prepared before you head out into the winter hills. Our top tips include:
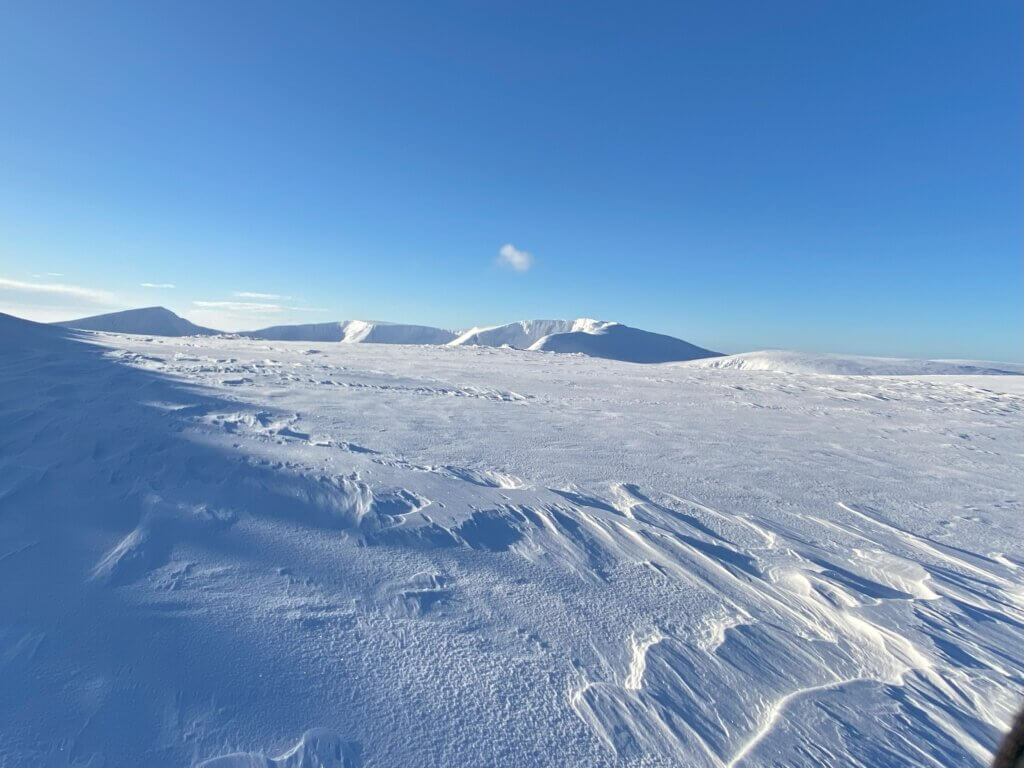
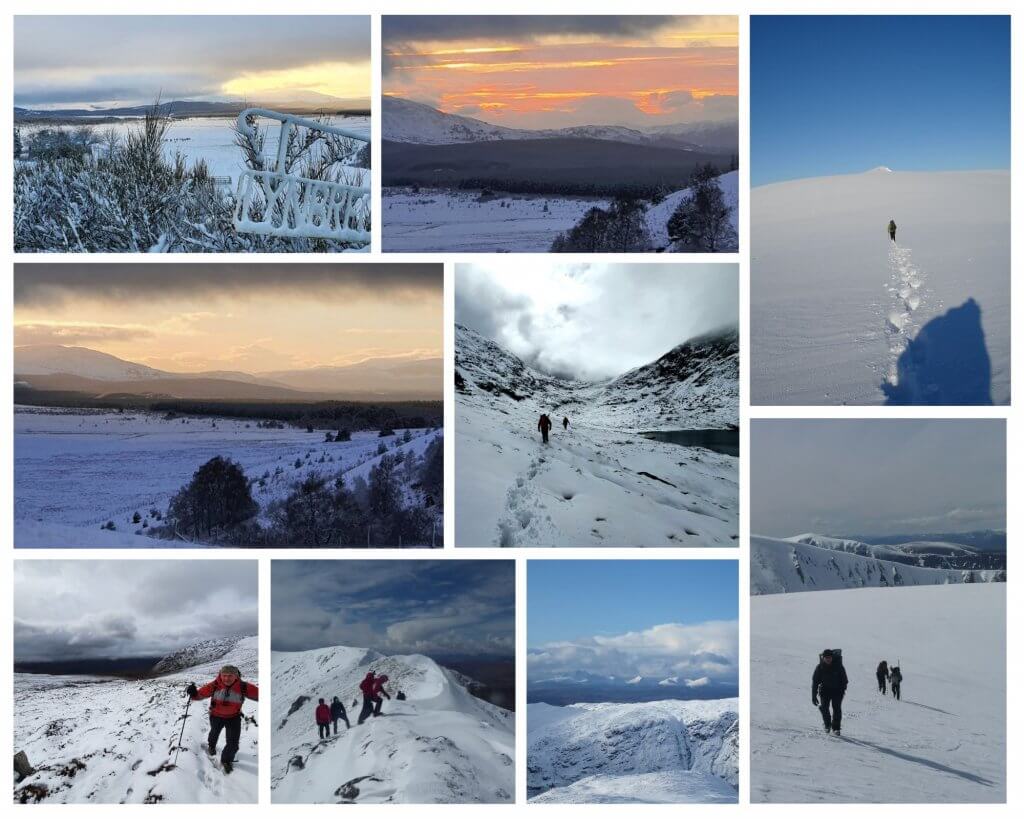
Cairngorm plateau, New Year Winter Walking 2022 – 2023
Preparation is key for those eager to embrace the winter landscape. Layered clothing, including waterproof jackets and insulated gloves, become essential companions (see our blog). As the landscape transitions from hills to mountains, the weather can be unpredictable, and hikers must be equipped to face the challenges that come with the season.
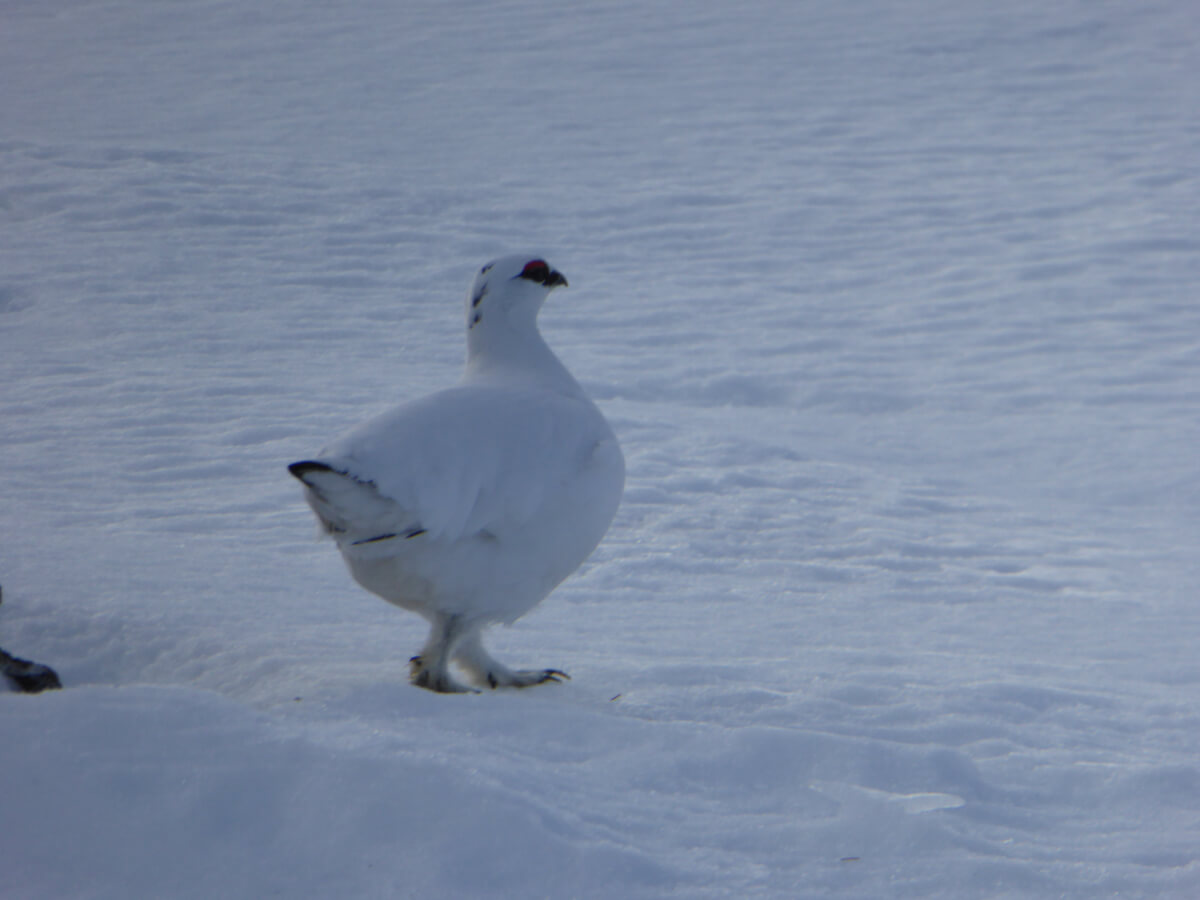
A ptarmigan makes walking across the snow look easy
Popular winter hiking routes in the Highlands include the West Highland Way, the Great Glen Way and the Speyside Way; which transform into a winter wonderland, offering panoramic views of snow-capped peaks and frozen lochs. The Cairngorms National Park, with its diverse trails, provides opportunities to witness the Highland wildlife amidst the winter spectacle; and for the intrepid this area can become a wilderness for the most intrepid to explore and indulge in winter sports and adventures like snow holing.
Hiking in the Highlands during winter is not just a physical adventure but also a journey into solitude and reflection. The silent majesty of the snow-covered landscape imparts a sense of serenity, inviting hikers to connect with nature on a deeper level.
Cozy hostels nestled along the trails and in the villages close by offer refuge after a day of winter exploration. Hostels provide a welcoming retreat where hikers can share stories and relish in the hearty warmth of local hospitality.
Winter hiking in the Highlands of Scotland is a testament to the enduring spirit of nature. It is an invitation to witness the marriage of untamed beauty and the thrill of adventure. So, lace up your boots, embrace the chill, and discover the enchanting transformation that occurs when the hills become mountains in the heart of a Highland winter.
Check out our range of guided winter walking holidays
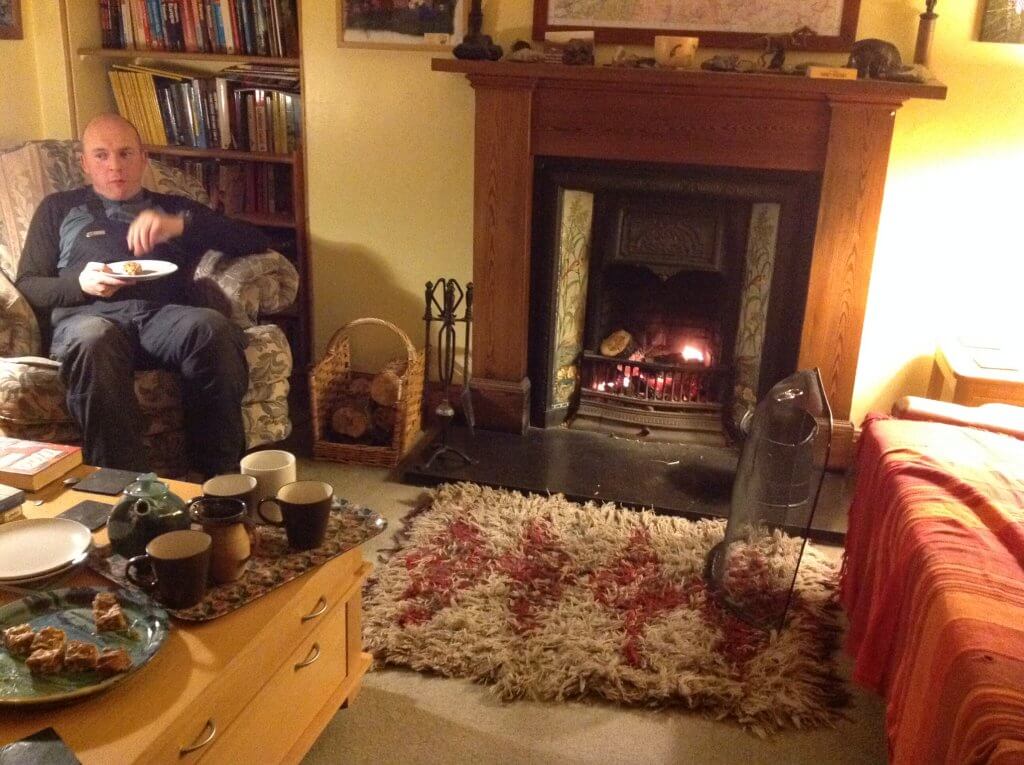
Everyone loves an open fire, almost as much entertainment as the TV
Have you ever wondered what all the fuss is about? Scotland. Why? Especially in winter must be far too cold and far too dangerous. Take a look – yes, it’s proper winter but isn’t that preferable to wet rain, umbrellas and grey days with little to differentiate between summer and winter, except for the lack of leaves on the trees.

Photo Credit: Paul Tomkins/VisitScotland
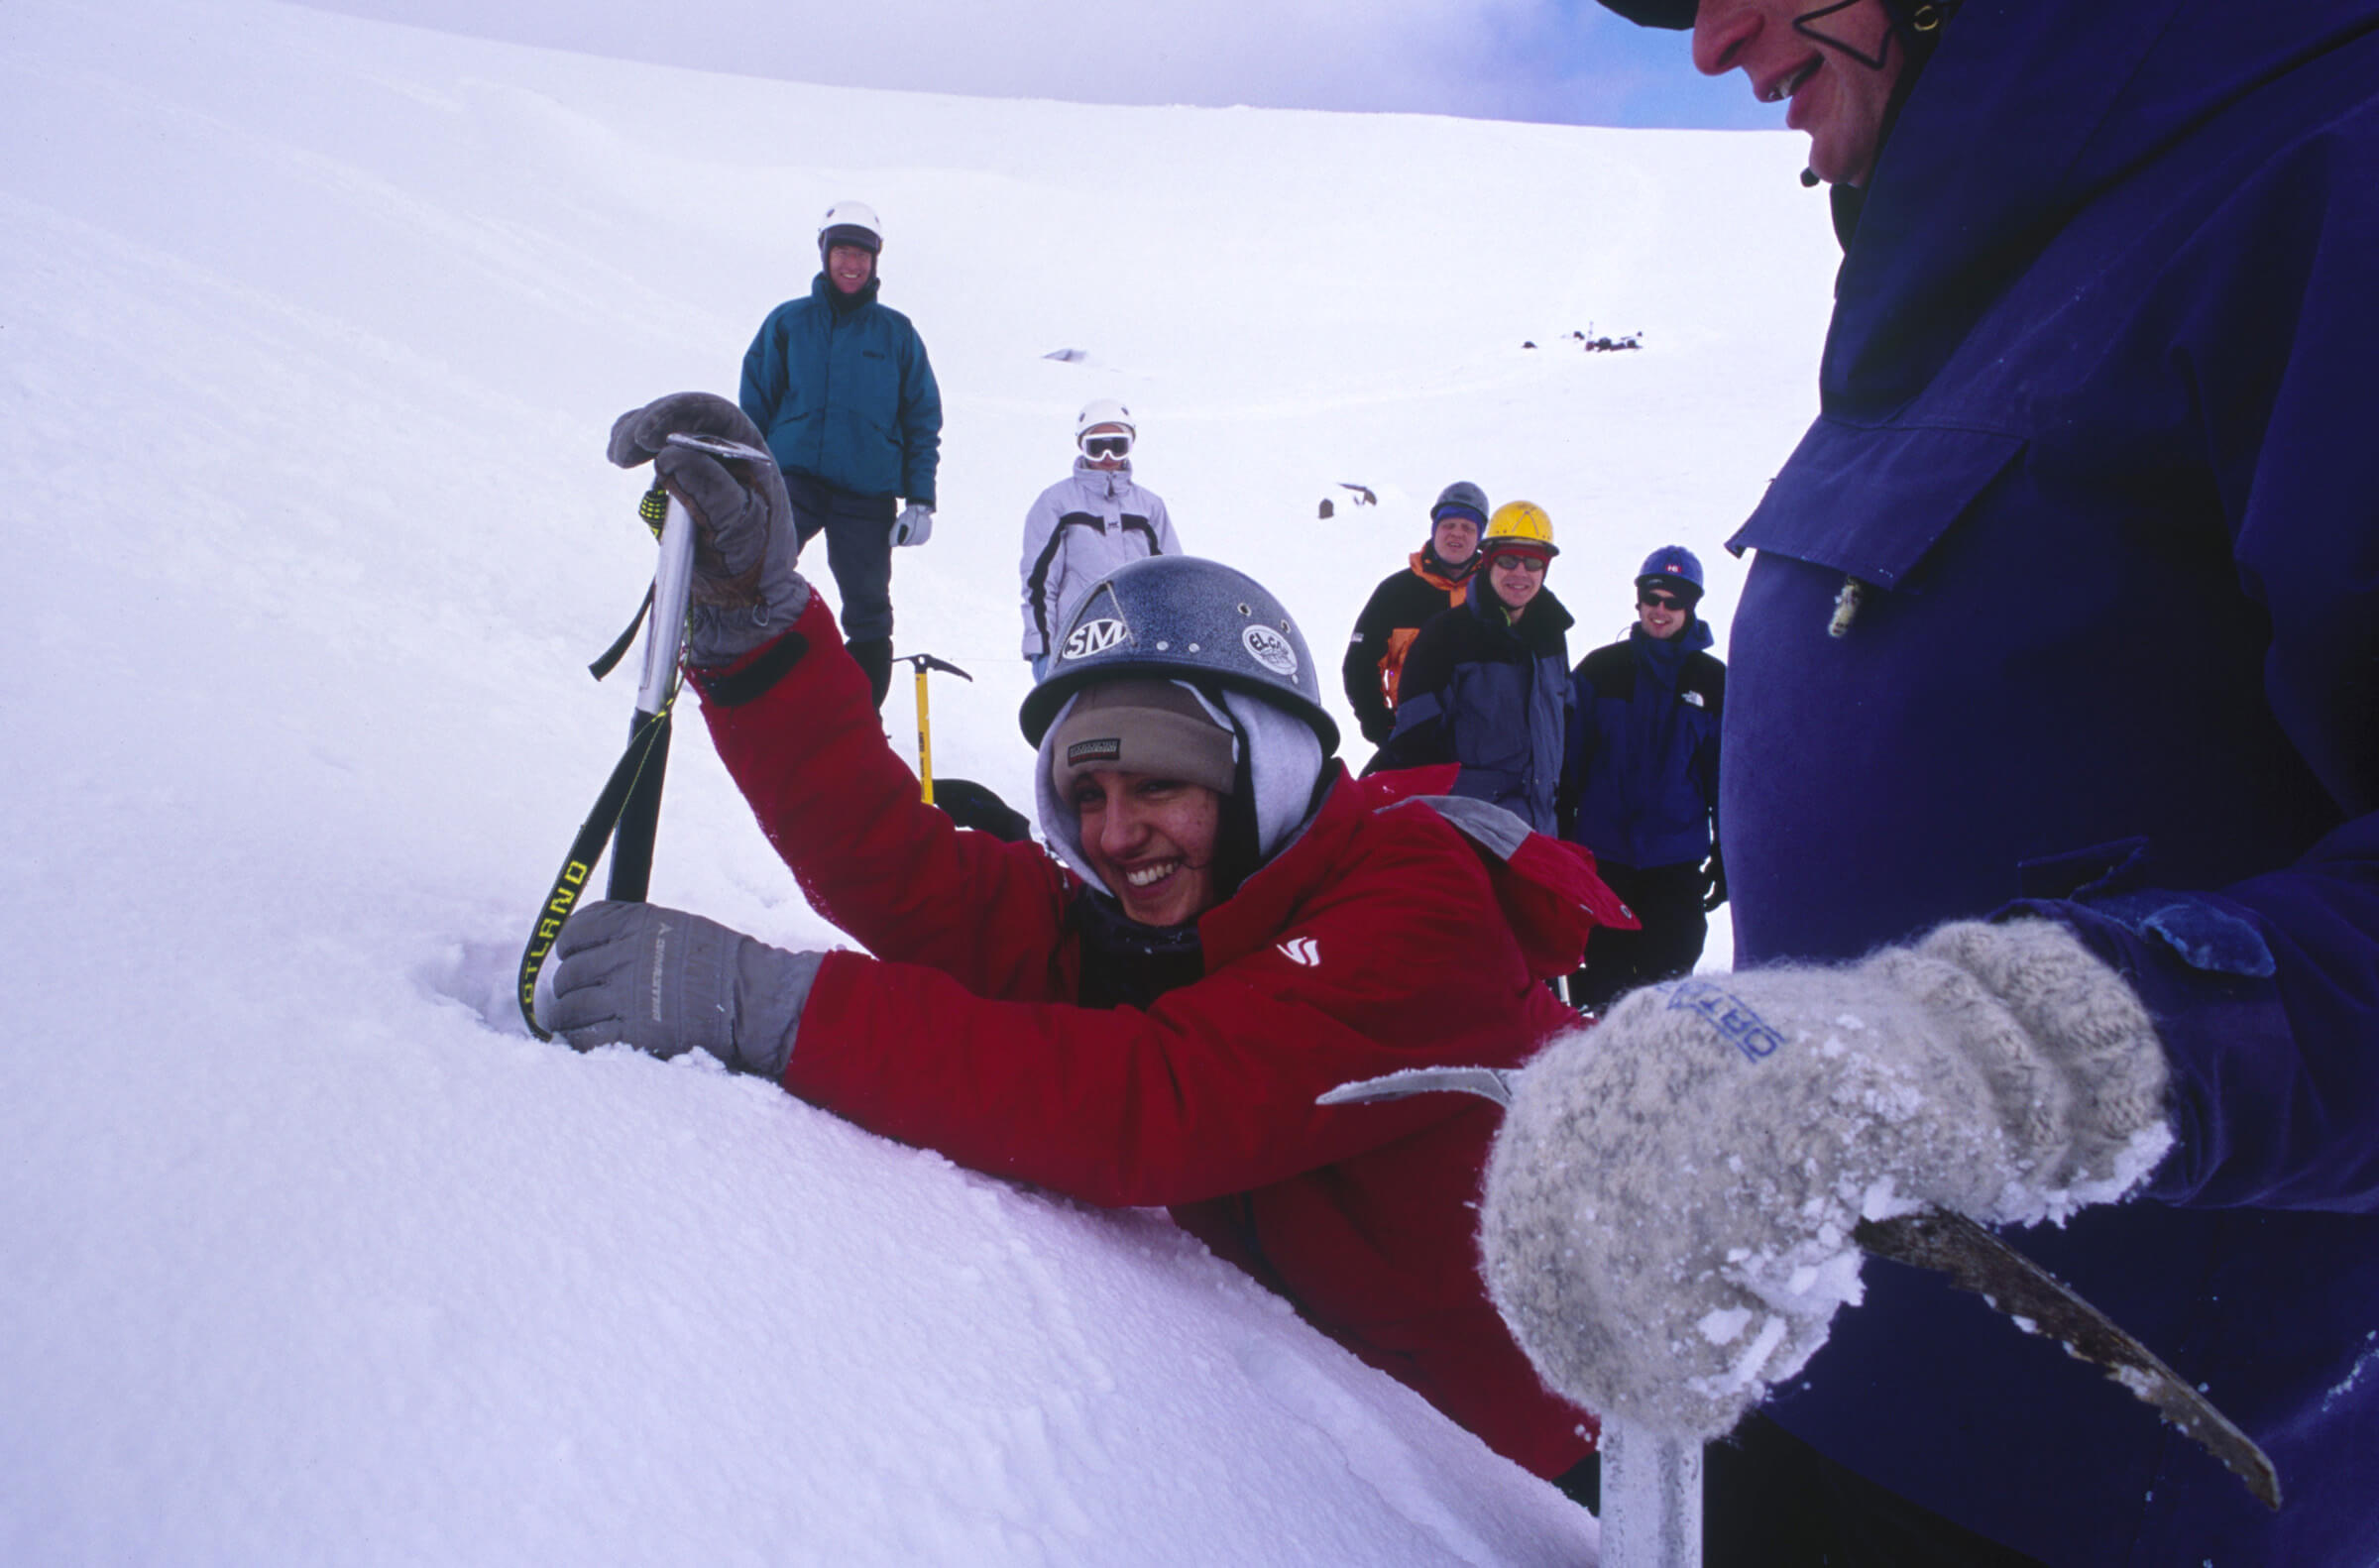
Digging out a snow hole site in the Cairngorms under the guidance of Andy Bateman of Scot Mountain Holidays. It’s not quite Sweden’s ice hotel as you have to create the living space yourself, but they’ll have a relatively comfortable night out of the wind, cocooned in their sleeping bags enjoying being cooked for and served a three course meal by their guide.
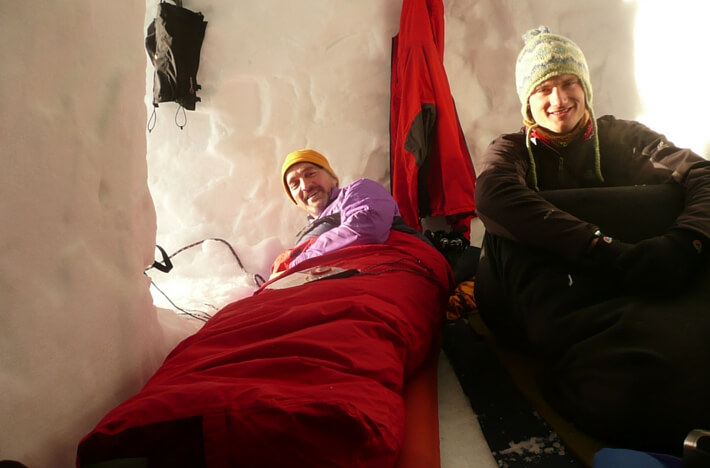
Build your own snow hole in the Cairngorms
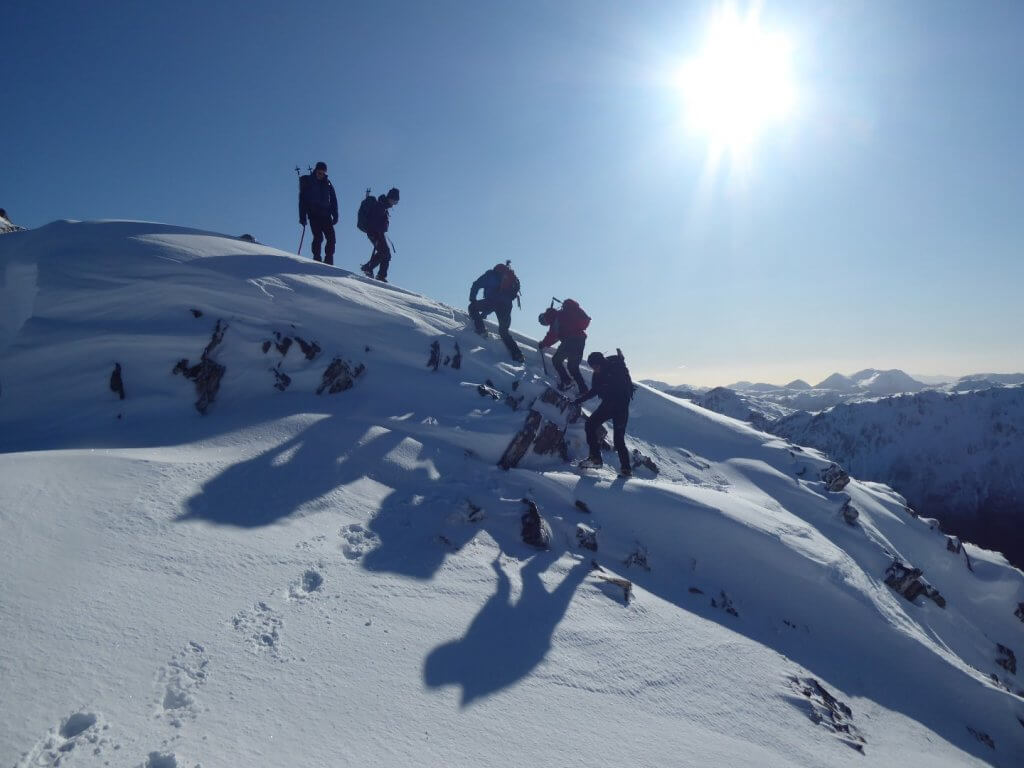
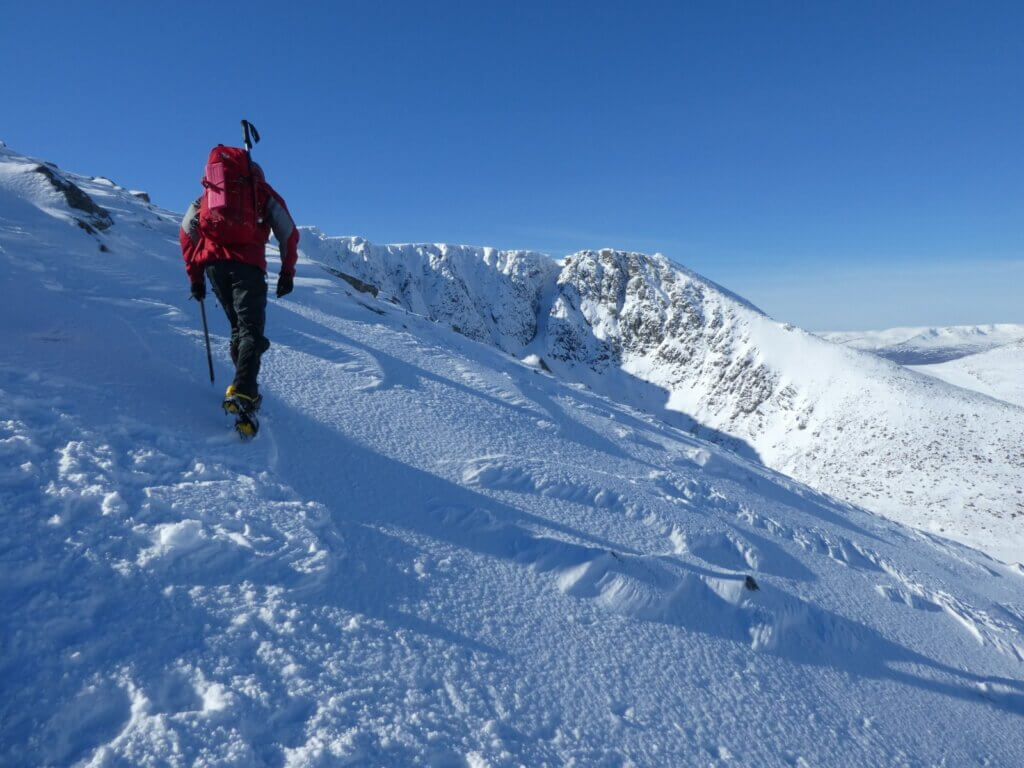
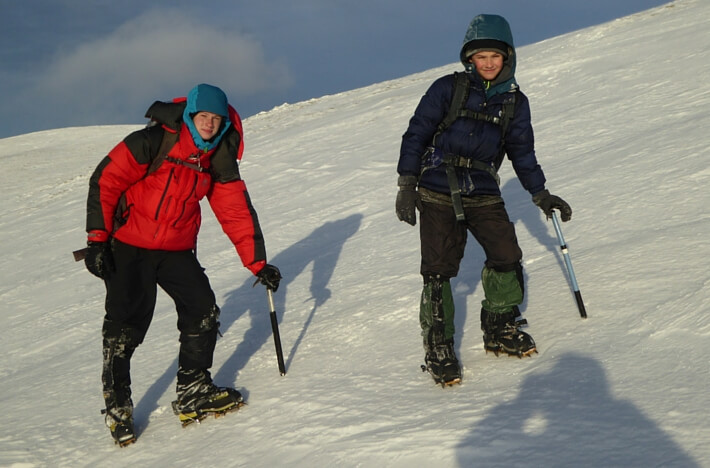
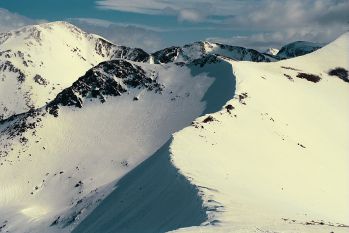
Hiking along the ridges of Argyll, Kintail or Glencoe – space to yourself away from all the crowds and views which stretch for miles under clear skies. We often visit the west coast of Scotland in March to bag some winter Munros: we’ve run trips in Argyll, Glencoe and Kintail. For this year’s offering check the calendar or the Munro bagging page. Some of our clients have left from these trips with the most spectacular images – but those are for another blog.

Photo credit: Dave Downing
The beauty of Glenmore in the winter. Snow laden trees and cross-country skiing opportunities. Short days are not always a disadvantage as they allow for the most spectacular photographic opportunities, as seen above.
Safety skills for walking in the winter hills, demonstrated here by Andy Bateman – ice axe arrest. Legitimate playing in the snow, but as part of a learning process on how to avoid a sliding fall.
Scotland on a cold, clear, crisp day in winter. What’s not to like, especially if you like to take stunning pictures.
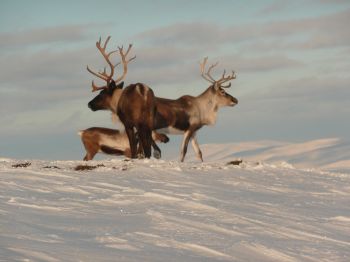
The Cairngorm Reindeer herd in their natural environment. When out walking in the Park, you can come face to face with the reindeer who roam the hills in winter.

The Scottish Munros, particularly the Cairngorms, are the only area of the UK where you can spot Ptarmigan. Ptarmigan change their plummage twice a year – they have a summer coat, a breeding plummage and a winter coloration to blend in with the snow. You can almost step on the Ptarmigan sometimes as they like to conserve their energy by walking rather than flying if they can and they nest on the ground – there being no trees at the elevation where they are found.

a chance to savour some of Scotland’s most famous and unique produce. Haggis is a traditional meal to celebrate Scotland’s greatest bard, whose influence can be found everywhere from the Birks of Aberfeldy (where there is a thinking/writing seat dedicated to Rabbie Burns) to the Winking Owl in Aviemore, where the great bard is said to have taken breakfast. You might not even be aware of his influence on your own life from: “And we’ll tak a cup o’ kindness yet, for auld lang syne” – which you’ll have sung if you’ve ever brought the New Year in; to “O’ my luve’s like a red, red rose, that’s newly sprung in June” and a special Scottish grace for a meal: “Soem hae meat and canna eat And some would eat that want it. But we hae meat and we can eat, sae let the Lord be thankit.”
Burns Night is 25th January and is celebrated throughout Scotland with a haggis meal and the address to the haggis – written by Rabbie Burns.

Scotland is famous for the colours of heather in the summer but the winter can be colourful too. This is the time of year that you’ll get to appreciate the sunset. The snow also reflects the light of the moon & stars if the sky is clear, so a night out in winter can be glorious.
snow will entertain the kids for hours and cost nothing, but make sure you’re well stocked with socks, gloves and hot chocolate!
Useful links:
Snow related activities for kids:
Free mountain weather service:
Met Office forecast for the hills:
Scottish Avalanche Information service:
There’s a lot to love about winter in Scotland – especially if you love the outdoors. The approach of winter just means that you can switch your “toys” (I mean gear) around and get some old friends out of the garage/cupboard. It’s nearly time to dust off the crampons and get the jumpers out so we thought it was time to remind you of the joys of winter.
Who doesn’t love a fresh coating of snow? It makes everything look clean and sparkly. Many of us (not just the kids) see snow and want to rush outside and make footprints. The arrival of snow brings out the inner child in all of us.
You can now legitimately light the fire and enjoy the warmth as well as the aesthetics.
Top tip though: make sure you have lodes your plenty of fuel inside before you begin, because the last thing you want to do is to leave the cosy warmth indoors to head outside for more fuel.
Need I say more – snowball fights are fun with the right kind of snow and can really be multi-generational.

Bring out your creative streak but if you’re going to go large you’ll find it quite a workout. What’s your preference to make his/her features. We’ve had to sacrifice several carrots.
It’s much more mesmerising than watching the rain and far less wet so it can even be enjoyable to watch the snow fall when you’re out in it so long as it’s not a blizzard and you’re not attempting to drive.
Not something everyone will be looking forward to but those who are in root will be looking forward to taking their sharp, pointy toys out of the cupboard and checking them over ready for the forthcoming season.
Why does snow make the landscape so much more attractive? I think it’s because the white of the snow brings out more contrasts and also makes everything look clean and neat. It’s also because the light is magical for taking pictures.
Time to break out all those lovely woolly jumpers.
One of the best things about winter is the lack of bugs, flies and midges.
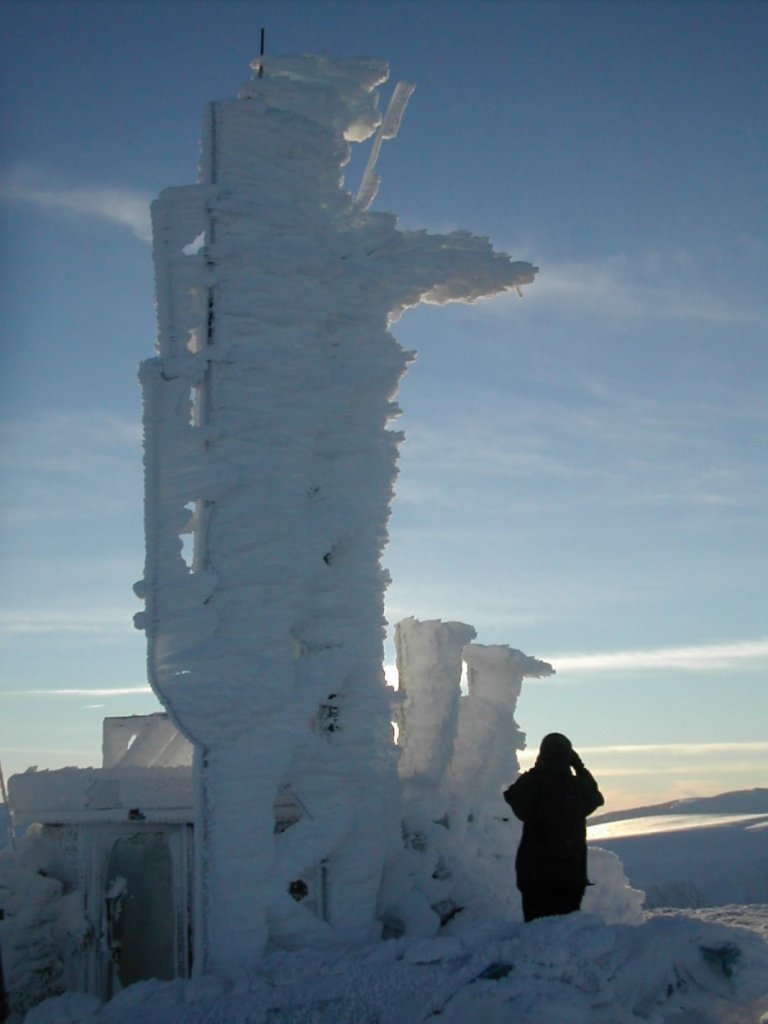
Frost crystals are quite stunning when you look at them closely.
Look at the image below. Can you believe that all of this is accumulated frost built into the wind from the original structure? This is what the weather station on the top of Cairngorm.
We are so lucky to be living on the edge of ski country. It still surprises us how many people, even those within the UK, who don’t know there is skiing available in Scotland. Yes, we might be suffering from the effects of global warming, but when the weather’s right – a ski day in Scotland is just about paradise.
Ice axe & crampons legitimate adult playing in the snow with sharp, shiny things during winter in Scotland.
When you’re not a kid any more, people tend to frown if you play in the snow. When you’re on a winter skills course, it’s encouraged learn about the snow and ice. You’ll have to slide down a slope with an ice axe, as you’ll need to learn how to stop a sliding fall.
You’ll have to cut holes in the snow, as you’ll need to know how to make emergency shelters – and so much more besides.

Views which stretch for miles are really a thing of winter. The air in summer is warmer and therefore hazier than winter.
Andy has had the privilege of being able to see from Cairngorm to Ben Nevis (55 miles) and has even picked up mountains well to the north all because the cold air is much clearer.

Winter is one of our favourite times of year. We try to keep it to ourselves. It’s not all that hard as so many people seem to be afraid of being cold.
The thing about being out in the winter in Scotland is all it takes is the right level of exercise and the right clothing and you’re sorted.
If you’re worried about it, why not let us be your guides.
We’re busy pulling together the final details for all our winter Munro walking trips, including a planned return to the Glencoe area. Despite not having written the prose to promote this itinerary we do already have bookings so best to express your interest as soon as possible.
We are delighted to announce our new, revised itinerary for our Winter Munros trip in Glencoe. We will again be based at River Mill Cottage and will be following the itinerary below as closely as the weather allows:

We have been in the Glencoe area before and have designed other itineraries for previous groups. Please do feel free to check these out in the private groups section, but bear in mind that in order to run one of these other itineraries for you we will need plenty of notice in order to arrange accommodation for your group and make sure that there is availbility for your proposed dates. Ideally we would plan a private group tour at least 6 months in advance.
Please bear in mind that since the Covid pandemic it has become increasingly difficult to book accommodation in remote areas with limited options.
there are trails all round the area plus several centres with purpose-built tracks like Laggan Wolftrax and Glenlivet Bike Trails. Bikes can be hired from Mikes Bikes or Bothy Bikes in Aviemore.

Enjoy the wild parts of the UK out on your bike
with G2 on the Alvie Estate.
Aviemore has a community ice skating rink again and you can also use the all weather rink at Loch Insh
you could take the public bus to Boat of Garten (5 miles) or Nethybridge (8 miles) and walk back to Aviemore stopping in the Old Bridge Inn for a pint on your return.
and paddle the Spey;
canoe with the Moray Firth dolphins or kayak/canoe on Loch Ness.

Water based options might not be as appealing as you think, but water is surprisingly warm in the winter.

a tour to Loch Ness is a popular option for our guests at Fraoch Lodge
and check out the Findhorn Foundation or visit the Kimberley Inn for lunch and walk along the white sands of the beach.
and try out ice skating.
unfortunately the Aviemore pool at the Macdonald’s resort is not currently available to the public for swimming.
and tour a distillery plus visit the Cooperage

Always a wet or cold day option – a distillery visit or whisky tasting.
or Johnston’s wool mill in Elgin if Knockando is closed. Tours are every hour until 3 or 4pm and are free of charge.
where you can experience the whole wool story from shorn fleece to completed material.

Get crafty if you’d like some time and space to knit, ask Rebecca for recommendations

If you like to see reindeer, you should come to Aviemore, particularly in the winter which is their natural habitat.
and/or the Highland Folk Museum

Traditional village which is part of the Newtonmore Highland Folk Museum
New website for the Cairngorms National park highlighting selected experiences within the park – cairngormsnationalpark.co.uk
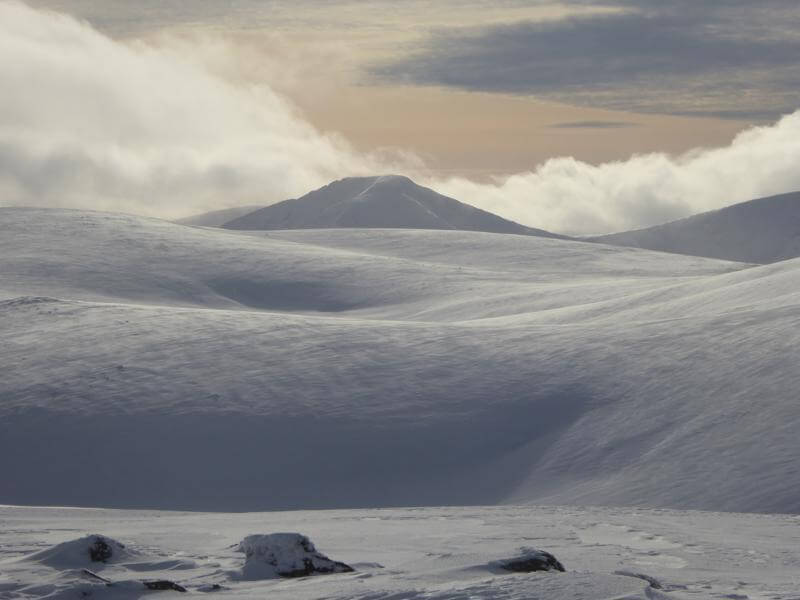
Photo Andrew Bateman, Spot Lochan Buidhe! Looking across the Cairngorm-Ben Macdui plateau towards Cairn Toul.
Come the winter months, one might be forgiven for thinking that lochs, lochans, tarns, lakes, etc would at least indicate their presence by a flat surface. Some do but don’t bank on it! High in the Cairngorms there are 3 lochs, all within 3 km of each other and all behave differently in winter.
Starting with the highest, Lochan Buidhe. It is perched on a broad shallow saddle at 1125m on the Cairngorm – Ben Macdui plateau close to where the Curran Hut once sat. Its high elevation and shallow nature mean it can pretty much freeze solid! Its bed is of raised granite blocks set in gravel. The blocks support the ice whilst allowing the ground water to drain out and so it can support no end of drifted snow thereby losing its dead flat surface.
At around 920m we have the pools on the floor of Coire an t-Sneachda. Again these are fed by ground water and drain out through the blocks and moraine to the north. Their water levels can vary considerably over time depending on the recent rain/melt. Frequently they will freeze over and then the water drains out from underneath the ice. The remaining ice sags under its own weight and the boulders punch through, again losing the flat surface. Any evidence of the pool can then be obscured by further snowfall.
Loch A’an – winter navigation & water features
Loch A’an (Avon) on the other hand self-levels since it’s much deeper. Remember water’s density is greatest at 4 Deg C so the warmest part of a loch is the bottom. Any snow drift on top of the surface ice will push it down into contact with slightly warmer water and melt it. The buoyancy is lost and over time the drift simply levels with the rest of the surface ice thereby maintaining a flat surface.
These tips and plenty more insights are covered on our 2 day winter navigation course
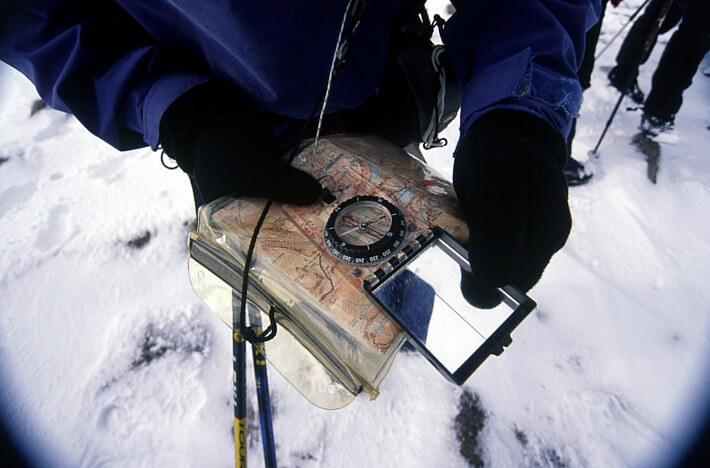
Having delivered navigation courses for the last 20 years here are Andy Bateman’s top tips and strategies.
It’s always struck me that describing winter mountain navigation as a bit of a “black art” isn’t a particularly helpful phase for anyone trying to get their head around the subject. Dealing with even the worst of winter white-outs isn’t rocket science but it does require the right approach, mindset and plenty of practice. Here are my top tips:
Of all the mountain navigation techniques and skills, contour interpretation is the most stand alone skill. In fine conditions it’s quite possible to get you to your objective without the use of any another technique. It should be the central pillar of all serious mountain navigation courses with all other skills and techniques relating to it.
Contour interpretation gives you your direction and distance. Where ever you are in the world, by definition mountains will always have slopes. Slopes have a gradient and an aspect, both of which are denoted by contour lines. Changing gradient and aspect combine to form many of the terrain features like ridges, valley’s, knolls, spurs etc. It’s by relating our position to these on a navigational leg that gets us to our destination. Also when things don’t go quite according to plan, its the terrain that may well indicate what “plan B” should be.
Seek out well defined but small contour features. Look for abrupt changes in either the spacing between the contour lines or abrupt changes in the direction of the contour. If both come together at the same point, fantastic! This well defined feature may well be discernable on the ground and it’s small size will help to pinpoint your position. Being able to recognise a good contour objectives in this way is an important skill. On navigation courses I often recommend guests take themselves onto a hillside and rather than aiming for the summit, practise seeking out these type of contour features.
Although vitally important in winter mountain navigation, compass work, dead reckoning techniques (timing & pacing), etc should serve to back up your contour interpretation in poorer conditions but never replace it!
Don’t let the conditions dissuade you from monitoring the terrain. Putting aside blowing snow, have you ever paced out the visibility in a winter whiteout? The actual visibility is often better than it appears. The lack of definition due to everything being white and the flat light, is often mistaken as bad visibility. Although often not great, quite frequently visibility will be 50m or more. 50m one way and 50m in the other direction gives you a span of 100m. If you’re on top of other aspects of your mountain navigation it can still be enough to monitor you position in relation to the terrain. In bad conditions it’s even more important that you are interpreting the contours.
Micro navigation in winter
Making a diagonal descent across a snow and ice covered slope with a strong cross wind, in a whiteout is going to challenge even the most experienced winter navigator to stay on his/her bearing. It’s changes in gradient or slope aspect that might be the only indication that you have you’ve drifted off your bearing or maybe gone too far.
Think about putting your crampons on when employing dead reckoning techniques. The last thing you want is to find you are unsure of your footing half way though your pacing or timing. It can be very disruptive. Get to know how wearing crampons effects your pacing and speed.
Navigational accuracy operates at 2 levels; firstly, accuracy in any particular skill or technique, and secondly, what could be referred to as “error management”.
There are well recognised techniques like: aiming off, attack points and collection features. Each of these techniques either corrects or negates accrued error.
Employ a number of techniques simultaneously so to avoid being dependent on the absolute accuracy of any one particular technique. If you’re properly monitoring gradient, slope aspect, features, distance and direction during a navigational leg you hopefully won’t go too far wrong.
Keep your navigational legs to below 1 km. A 10% error in distance or direction over 2km is going to be 4 times that compared with that over 500m. The more contour features you can identify, the more waypoints you have and hence the shorter your legs can be. It all goes back to the contours!
Be wary about navigating to water features in winter. Stream channels often fill with snow leaving no surface indication of their presence. Shallow Lochans, lakes and ponds readily freeze solid and won’t sink when loaded by further snowdrifts leaving us without even the luxury of flat surface. The shallow margins of deeper bodies of water can behave similarly thereby reducing their apparent size. Some lakes freeze over and the remaining water drains out. The unsupported ice, which may be buried by snow, then warps and takes on the form of the undulating lake bed again robbing us of any indication of the lakes position.
At the end of a navigational leg make sure you’re definitely at your intended objective. Reassess your timing and pacing. Snow conditions can change within a matter of hours. Was your estimated speed correct or did that unexpected patch of deep soft snow you just had to plough through slow us down? How does the terrain look? The next leg may well accrue a little error. You don’t want to compound the situation by transferring error from you last leg to it.
Keep mental arithmetic to an absolute minimum
Use the romer scales on your compass base plate. Mental arithmetic is easily done in indoors but it can be a whole lot more difficult whilst being battered by high winds and sub zero temperatures.
Available for purchase (£5)
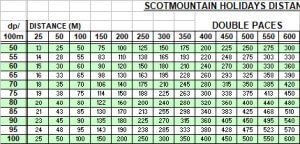
Use a time-pace matrix with pre-calculated times and double pace figures. The more comprehensive the better! Aside from increasing accuracy, a very detailed matrix affords you the ability to compare values of similar double pace rates or speeds for the leg distance. The difference between similar values in effect indicates an acceptable range of error relative to the length of the leg. You can then use this to compare with what other techniques are indicating. – an additional powerful navigational tool!
Use some method to count paces. You will have other thinks to keep an eye on and there is always a chance of an interruption. It’s easy to loose count. Using the traditional cord with toggles on the rucksack strap keeps your hands free.
Your brain is your most important navigational ‘tool’ so plan regular short breaks to keep it well nourished with food and drink. I find 80 mins of walking followed by a 10 minute break generally works well. A stop of this length is quickly used up to adjust clothing, eating, drinking, etc, but more than this and you will start to chill quickly.
If you’re cold, stop and do something about it. Don’t necessarily wait for the next ascent to warm you up. A resultant lack of resolve to make sure things are right may lead to a navigational error that leads to a much greater delay.
Make a rough estimation of what your bearing will be before you take it. This will help to guard against making simple but easy mistakes. NE bearing will be around 45 degrees plus or minus 22.5 degrees. 22.5 degrees is the difference between NE and ENE. If its S it will be around 180 degrees, W 270 degrees and so on …
You may well have to opt for less ambitious objectives than you might normally do in the summer. The available daylight will be less. The conditions, the wearing of crampons and the carrying of a heavier pack makes for a slower pace. You will invariably have to make more stops to; check the route, put crampons on & off, etc. than compared in winter
The route you take may have to be less direct to take in more and better defined way-points.
When planning your route take into account avalanche hazard. No only do you need to consider whether the terrain you cross may be prone to avalanches but whether you may be crossing the run out zone for avalanche prone terrain above. The earlier you start incorporating avalanche hazard evaluation into your route planning the better.
Invest in a good pair of snow goggles. You can’t afford to be without your vision. Even snowflakes hitting your eyes on relatively light winds can be particularly uncomfortable. Trying to navigate into the teeth of a 30mph blizzard without eye protection is purgatory. In the bad conditions sunglasses become useless. Adequate eye protection is an absolute must.
Don’t skimp on this thinking it’s just for emergencies. The challenges of navigating high in the mountains after dusk can increase substantially. A strong beam can really help. During the winter months the chances of finishing the day in the dark increase substantially.
These can be useful in strong winds or soft snow but don’t allow their use to prevent you from employing appropriate navigational techniques, or for that matter your ice axe. If the compass is in use and you’re frequently referring to the map, etc then your poles are best stowed away.
a) An adequately sized transparent base plate (10cm plus in length),
b) A magnifying glass for examining contour detail
c) Romer scales to help minimise mental arithmetic.
Over the years I’ve had guests turn up on navigation courses with either the wrong type of compass or cheap poorly designed ones. It’s often not until guests start to use them on the navigation courses that they realise their failings. Silva produces good one. Choose yours carefully.
On navigation courses cameras and mobile phones have been the main culprits for interfering with compass needles when brought too close. Be conscious of where these are stored in relation to where your compass is stored and used. Steel components on ice axes & trekking poles can also have an effect. On one navigation course a guest had magnetic closures in the storm flap of her jacket zip!
Guests are often surprised we don’t automatically go for the 1:25 000 maps on our navigation courses. It is down to personal preference but here are 3 points to consider for winter?
A 1:50 000 map has twice as many grid eastings as on a 1:25 000 (2 cm & 4 cm spacing respectively) making it much easier to find an appropriately positioned grid easting when taking a bearing. In most compasses the needle housing is approximately 4cm in diameter, the same as the spacing between grid eastings on a 1:25 000 map. With this scale in bad conditions the lack of eastings can be an irritation when trying to take some N-S-ish bearings. This problem is exacerbated by compasses with small base plates.
The wealth of terrain information e.g. loose rock, heath, etc on some 1:25 000 scale maps tends to obscure the contour lines. In winter this extra surface information is often irrelevant as it’s buried.
By opting for the combination of a 1:50 000 map and an A5 sized map case (Ortleib referred to it as a A5 ‘document Bag’) you’ll find the map far more manageable in high winds. At this scale an adequate area of the map is displayed to avoid refolding the map on the hill but is small enough to conveniently fit in a jacket pocket for easy access whilst being weatherproof in a map case.
Your map case is a means by which you can attach the map to yourself.
Scot Mountain Holidays runs mountain navigation courses throughout the year both as stand alone courses as well as part of our winter skills courses.
It’s all in vogue these days. As our normal lives become more and more sedentary, there’s an increasing emphasis on keeping fit. As we get older too, it becomes increasing difficult to maintain our fitness levels. We can’t afford to hibernate over the winter. Instead of heading abroad, we can take on a new experience and continue getting out in the countryside throughout the winter months. If you find the winter weather a challenge or too scary, take a course to give you the confidence to get out walking the hills in winter.
Extra ways of burning calories while walking in winter include:
All of which you can tick when you go hillwalking in winter.

As far as anyone can tell, the “one pound on your feet equals five pounds on your back” notion originated with Sir Edmund Hillary’s successful ascent of Mount Everest in 1953. Since then, numerous studies by academic researchers and even the U.S. Army have concluded one thing on the matter: Weight on the feet is disproportionately more exhausting than weight carried on the torso.* To find out more read the links in our further reading section. Therefore walking in winter boots requires more effort and will burn more calories!

The air in winter is so much more crisp and clear than in the spring/summer months. In spring the large estates who own huge swathes of the Scottish hillside, often start to burn the heather to maintain the grouse moors. Obviously this produces a haze from the smoke which can affect visibility. In the summer the air is generally more hazy due to the humidity which then affects how far you are able to see clearly.
In the middle of winter it is possible to see 100km or more from the high hills. For example, Ben Nevis can clearly be seen from the summit of Cairngorm.
Challenge is the big buzz word these days. Have you run your first marathon? Have you participated in your first triathlon/ironman? Tough Mudder anyone? Compared with challenges like these, winter hill walking is much more accessible and something you could do every day (in season). The biggest challenge for winter hillwalking is building up your stamina when you’re also trying to hold down a full time job. Many of us have deskbound jobs these days and the closer we get to “middle-age” (our 40s and 50s) the more difficult it is to maintain fitness and stamina levels. However, in the course of a week, many people find that their fitness and stamina levels noticeably improve on a guided winter hill walking trip.
On a typical winter walking day out with Andy, the guests record steps in excess of 30,000 per day! You’d be well on your way to your #Walk1000miles at that rate.
Sharing is a major part of walking. People tend to chat as they walk in a group and often end up discussing all manner of topics; setting the world to rights. When you share an interest (i.e. walking) already with the people you’re with, chances are you have topics in common you can discuss without coming to blows. Of course, camaraderie is not something which is confined to winter, but there is something about pitting your skills against the environment which pulls your group together and gives you something to share.
It doesn’t matter what sport you’re enthusiastic about, people love to talk about their gear and share their experiences of using it. When it comes to winter walking, if you’re a novice, you will need to make some investments to upgrade from your summer/autumn walking equipment in order to be safe in the winter hills. If you’re not sure it’s going to be your thing (though if you already enjoy walking, you might get hooked quite easily), you can always hire the technical stuff – winter grade boots, ice axe and crampons, before making the leap yourself into buying the kit.
Sliding around in the snow with a sharp tool – sliding down a hill on your bum – digging in the snow – kicking into ice with crampons – all become legitimate “skills” when you’re on a winter course learning the “personal safety skills” of safe movement on the winter hills.
To go out walking you don’t need to pay for a lift pass for every day you want to go up the hills.
You don’t need to buy the skis and generally you’re further away from the ski lodges, so you don’t have access to the cafes and restaurants, which means you have far fewer opportunities to spend your hard earned pennies.
Gaining new skills and becoming proficient in using them builds confidence not only in the activity you are doing, but also in other areas of your life. It is always a good idea to keep your brain active and to learn new things, particularly if you are also learning new physical skills which will help your body remain fit as well as your brain.
If you’re a novice or if you’re lacking time to gain the skills yourself, remember that winter is harsh environment and not everyone has the experience to head up into the mountains but there are plenty of local, highly-qualified guides who are very happy to take you out.
It’s much more fun to share unusual experiences with your friends. Most people like to see images and videos of adventurous activities, spectacular views, mountains, nature – you can tick all these boxes when you record your experiences out and about in the winter hills, then share then on your favourite social media channel. You’re virtually guaranteed some interaction with your friends/followers.
*A pound on the foot – the science
The Great Outdoor Forum (Stack Exchange) – discussion on the science behind extra weight on your feet.
The northern corries of the Cairngorms in their winter garb
A guy headed up into the Cairngorms to go winter climbing. He slipped awkwardly and broke his leg. Fortunately he had his mobile phone with him. He rang mountain rescue, who ascertained that he had all the right gear with him and he know where he was; the forecast was good but they were unable to reach him at that time and would send the helicopter in the morning.
Unbeknownst to the climber, just over the brow of the hill, out of his line of sight, was another guy who planned to camp out over night. Each was unaware of the other. The camper woke up in the morning feeling a wee bitty cold so he decided to cook himself some toast over his camping stove.
As he was eating his toast he heard the unmistakable sound of the rescue helicopter. He watched the winchman descend and pick up the stranded climber and thought: “Oh dear, there must have been someone out there all night.” However, he didn’t really think much more about it.
The climber however, was very thankful that he’d been found at last. He said to the winchman: “Thank God you came to get me. I was beginning to hallucinate. I thought I could smell toast.”
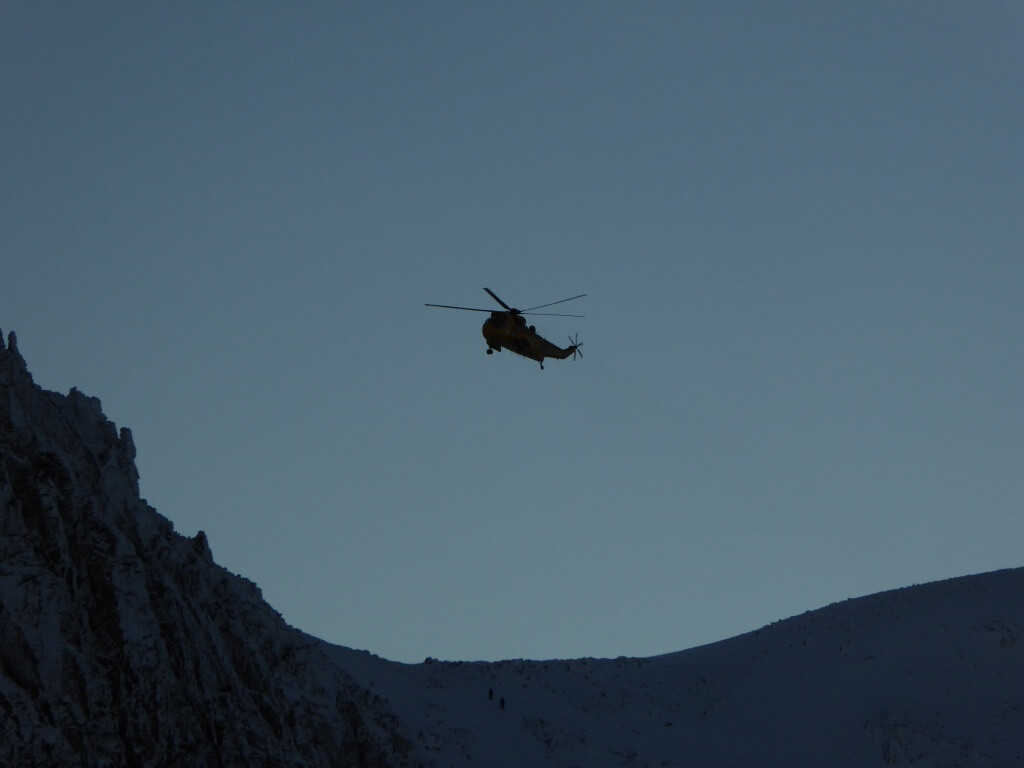
Yellow Whirlie Bird in action in the Cairngorms
If you’re interested in more images from the Cairngorms, from year round visits into the mountains, try our Instagram account
For more news and stories follow us on Facebook
Be safe and be prepared when heading out in the hills at any time of year, especially winter.
If you are looking for some help refreshing your skills for winter, please don’t hesitate to contact us
1. The most amazing snow hole group
2. Why do we call it Hogmanay?
4. Why come to Scotland in winter?
5. How to prepare for a winter skills course?
![]() Scot Mountain Holidays (Ltd),
Fraoch Lodge, Deshar Road,
Boat of Garten,
PH24 3BN
Scot Mountain Holidays (Ltd),
Fraoch Lodge, Deshar Road,
Boat of Garten,
PH24 3BN


All content © Copyright Scot Mountain Holidays 2026
Responsive web design by Summit Web Solutions