If you’re an active family with kids aged 12 and up, yearning for an unforgettable adventure, look no further than the Highlands of Scotland. Scot Mountain Holidays offers a unique 2-day, 3-night experience designed to immerse you in the stunning landscapes and rich history of the Cairngorms. Here’s a glimpse into what awaits your family on this off-the-beaten-track journey.
Your adventure begins with a warm welcome at Fraoch Lodge. Arrive later in the day and join us for a delicious dinner made from local produce, much of it sourced from our own garden (except in the depths of winter). Over dinner, we’ll chat about your travels, families, and plans for the days ahead. Andy, our experienced guide, will check the weather and suggest a route for the following day’s hike. He’ll also ensure you have the right gear, as Scottish mountain hikes offer few opportunities for last-minute changes or resupplies.


Wake up to a hearty breakfast of your choice, prepare your packed lunch from an array of fresh options, and get ready for a day of exploration. Andy, who has been guiding in the Cairngorms for about 25 years, will lead you on a hike designed to familiarize you with the area. His deep knowledge of the landscape and its history will make this an enriching experience. You’ll learn about the unique flora and fauna, geology, and environmental conservation efforts in the region.
After your hike, return to the lodge where tea, cake, and a cozy fire (weather permitting) await you. Before dinner, we’ll review the weather and plan your route for the next day. This time, you’ll be on your own but fully equipped with a map, route description, and any necessary transportation arranged by us.
Start your day with another delicious breakfast and prepare for your self-guided hike. Armed with the knowledge and experience gained from your day with Andy, you’ll set out on a personalized route designed to match your ambitions and the prevailing weather conditions. Whether it’s a linear trail offering new vistas or a loop showcasing the diverse landscapes of the Cairngorms, you’re in for an adventure.
One of the highlights of hiking in this region is the chance to encounter wildlife. The Cairngorms are home to capercaillies, crested tits, reindeer, pine martens, wild cats, and the rare red squirrel. You never know what you might see on your journey.
At the end of your hike, we’ll pick you up and bring you back to the lodge for more tea, cake, and relaxation by the fire. This simple formula of eat, sleep, hike underlies all our trips, ensuring you’re well-fed and rested for each day’s adventure.
On your final morning, enjoy a leisurely breakfast and soak in the last moments of your Highland retreat. Despite the physical exertion, you’ll leave feeling mentally refreshed and ready to return home with memories of an incredible family adventure.
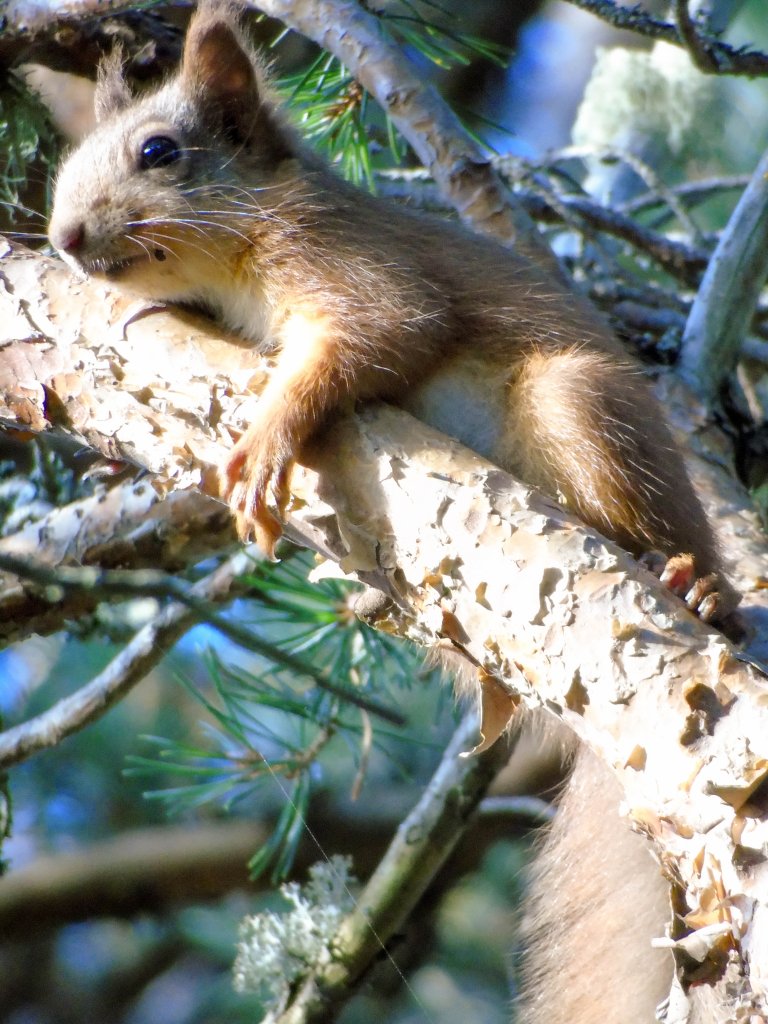
Only 120,000 red squirrels are left in Scotland. Less than half the number of grey squirrels.
Our “Get Off the Beaten Track” package is designed for families looking to explore and understand the Highlands through the eyes of an experienced guide. The base package includes:
For those looking to extend their stay, we offer optional packages including:
Ready to plan your Highland adventure? Email us for help in crafting the perfect vacation, hitting all the Highland hotspots and uncovering off-the-beaten-track surprises. For inspiration, check out our Pinterest board and Flickr account.
Join us at Scot Mountain Holidays for an adventure that will bring your family closer to nature and each other. The Highlands of Scotland are waiting for you!
Email us if you think we can help plan your vacation in Scotland – we can hit all the Highland hotspots and include some off the beaten track surprises you might not know about.
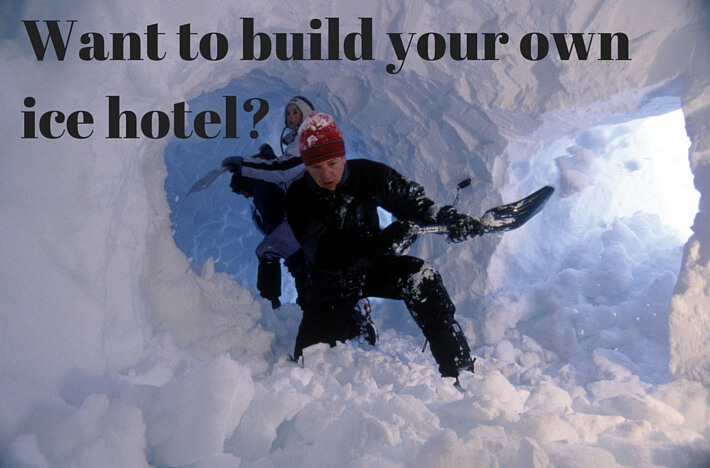
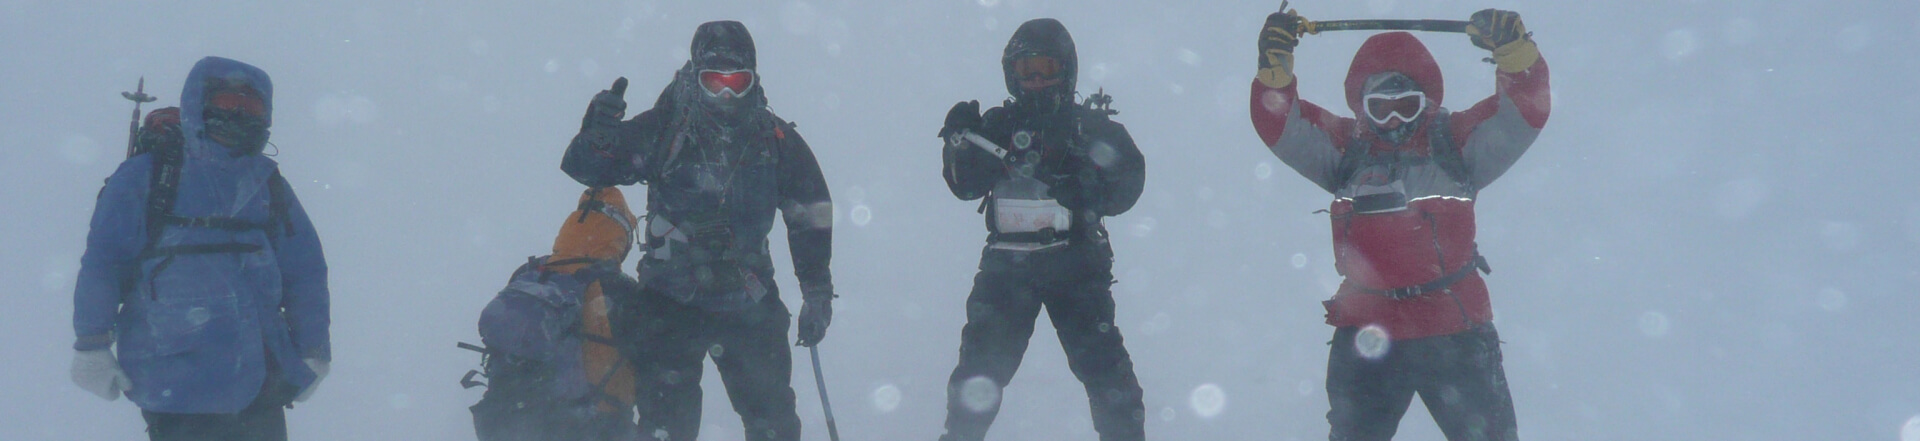
Snow-holing in Scotland has a long established history in both our own winter mountains and further afield. Over the last 10 years, snow-holing has grabbed the attention of the media and the viewing public. This exposure has introduced and encouraged people happy enough to pay for the experience. Andy Bateman* of Scot Mountain Holidays asks, should we assume what works in other mountains will work well in our own?
Likely Ambient Temperature
With the seasonal minimum in some recent Scottish winters approaching -20oC and an official record of –27.3oC, you would be forgiven for assuming you’d might be sleeping in temperatures approaching those of Arctic Norway.
Yet Cairngorm (1245m) has only ever recorded around half of this at –16.5oC (12th Jan 1987). Supporting this, Coire Cais Ski Base Station (630m) has a low of -9.2oC. The residents of nearby Nethybridge (210m) though, claimed the mercury dropped to -31.3oC on 10th January 1982. Satellite evidence suggests they were right!
The vital bit of information on these -30-ish lows are that they were all recorded during temperature inversions. The cold air flowed off the mountains and pooled in the valley bottoms where it cooled further whilst the mountain summits remained appreciably warmer. These record minima are in no way a reflection of the likely temperature you would find on our mountains. It’s not surprising when we’re never that far from a relatively warm sea in the UK!
So what temperature is likely when snow-holing in Scotland, let’s say, in the Cairngorms at around 1100m? The seasonal minimum for 900 m is usually around -8oC. At 1100 m this could translate to -10oC. Far more frequently winter temperatures at this height are around -5 and above. Our mountains simply don’t experience anything like the temperatures you might get in e.g. Arctic Norway.
Considering the warmer temperatures when snow-holing in Scotland, do we really need snow-hole features designed to capture warm air? Are sleeping platforms and cold air drains really necessary or should our aim be to lose the warm air?
Snow is a great insulator. A meter thickness in your roof and front wall is of vital importance in this regard. That is 20 cm of insulating snow both on the exterior and interior surfaces with 60 cm of well insulated structurally sound snow. Light penetrates to a depth of around 75 cm so if you see daylight, they’re getting too thin. It should also be borne in mind that a 1 m thick roof represents a considerable weight. It’s vital the front wall is adequately thick and strong enough to support the roof.
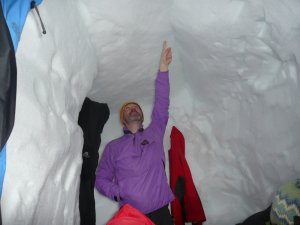
How high is that roof? Look at the apex centre.
Snow-hole sites by virtue of their high snow accumulation and steep slopes can be prone to avalanches. To be safe, you may need to pick a slope with a more gentle gradient and spend more time digging out the entrance. The majority of avalanches occur on slopes at or above 30 degrees. To maintain a 1 m thick roof, on a slope less than this, you’ll have to dig in a minimum 2+ horizontal meters from the top of the doorway before you start widening out the living area.
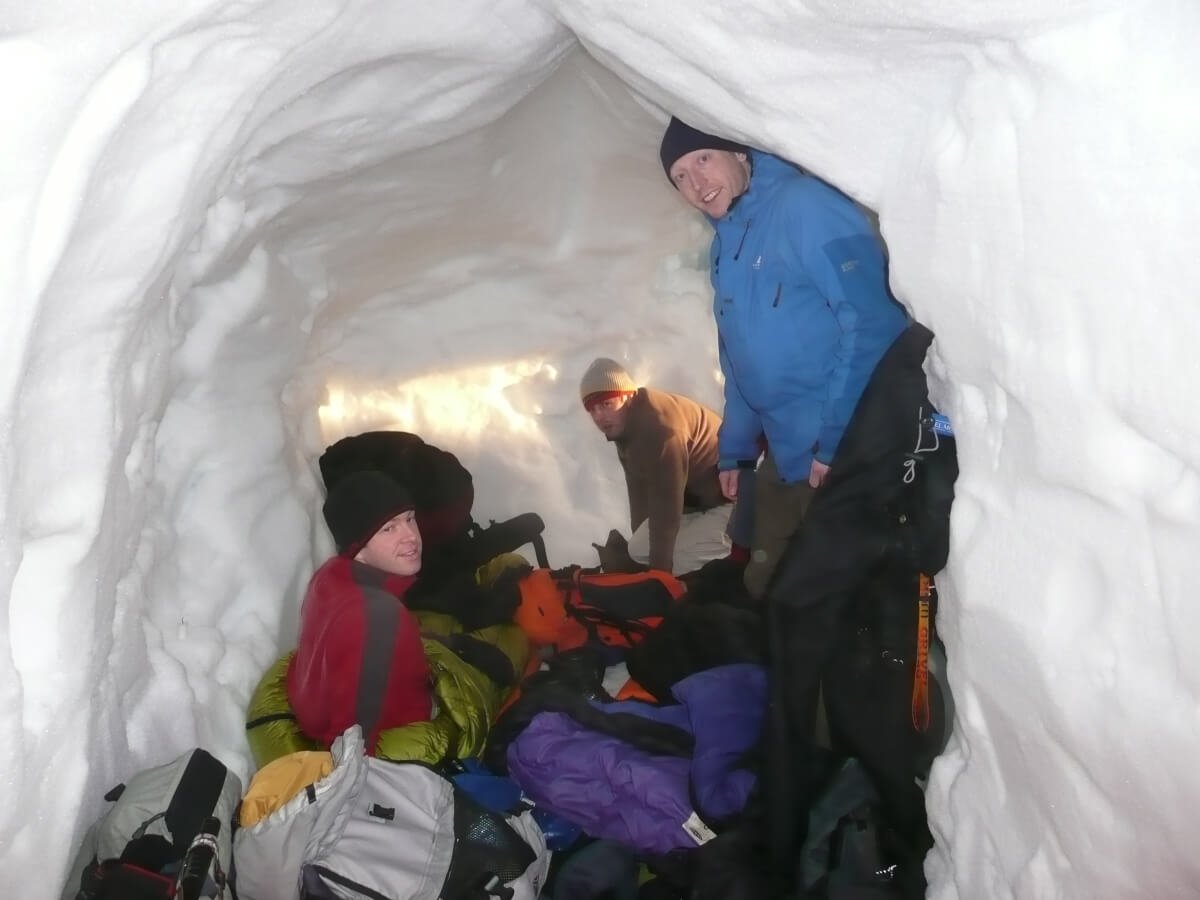
Avoid large areas of unsupported roof by keeping your snow-hole narrow. Aim for a depth of 2 body widths between the internal surfaces of the front and back walls.
This means you can create a relatively steep-angled apex ceiling which helps to avoid any drip points. Warm air can then be channelled towards the ventilation holes at the apex high points. In addition with it running the length of the snow-hole it increases the height with minimal snow removal giving everyone the opportunity to straighten their weary backs!
Importantly it also removes the unsupported dead weight from the ceiling. This is one of the most important aspects of snow-holing in Scotland. Although not mutually exclusive, removing the ceiling dead weight is of more importance to ceiling stability than temperature! Very few, experienced and inexperience alike, pay attention to removing the dead weight. I’ve managed to snow-hole once at +5 Deg C without any roof deformation! The roof of a snow-hole I constructed for the BBC Travel Show lasted through until around the 25th June!! The ceiling at that point was only a foot off the floor, but it hadn’t collapsed!! Every other snow-hole at that point was merely a hollow in the snow. As you create the apex be careful not to make the roof too thin. The strength of the roof is in it’s thickness.
Make sure there is good ventilation. My test is to regularly watch my breath. If it drifts off to one side it’s a good indication that ventilation is adequate. Cooking with pressure stoves in a poorly ventilated snow-hole is extremely dangerous due to the formation of toxic Carbon Monoxide. All pressure stoves work by first oxidising the fuel to Carbon Monoxide (CO) and then to Carbon Dioxide (CO2). The different colours in the flame indicate this. Irrespective of good ventilation a pan of icy water can have a severe quenching effect on the flame preventing combustion of the CO. Research for the British Antarctic Survey (BAS)** showed in heating a pan of icy water CO production could be significantly reduced by raising the pan supports higher above the flame. Snow-holers should acquaint themselves with the symptoms of CO poisoning.
To put this into perspective, I’m unaware of anyone in the last 25 years dying from CO poisoning whilst snow-holing in Scotland. I do know though, instructors who’ve attributed head aches to possible CO poisoning. It’s worth considering taking a small portable CO detector with you. In a snow-hole with a single entrance and no through air movement, ventilation may well be inadequate. Extinguish candles before you go to sleep as they also produce small amounts of CO.
Although the temperature may remain around 0oC you may well still be “injecting” appreciable heat energy into the snow pack. It takes considerable heat energy to turn snow at 0oC into water at 0oC so it will not be reflected in a temperature rise. It’s far more desirable that this heat energy drifts out of the doorways than being absorbed by the snow pack.
Make it large enough to stand up in. Large communal snow-holes are less prone to an abrupt temperature rise as they have better ventilation characteristics by virtue of having several entrances, etc. An entrance walled up with blocks in combination with an open doorway will often still allow plenty of ventilation.
Putting aside the dangerous scenario of cooking in a poorly ventilated snow-hole, I’ve never got up in the middle of the night to purely unblock a doorway for ventilation reasons. All the medical research I have seen (references below) doesn’t suggest there is any potential of becoming severely hypoxic in your sleep. Studies suggest sleep will become agitated, you will awake and in doing so get up and ventilate a stuffy snow-hole.
One potential hazard of digging a small snow-hole is you don’t have enough space to put the snow as you attempt to extricate yourself after a night of severe drifting. On one occasion I did have to tunnel out 1 ½ m before I hit the surface!
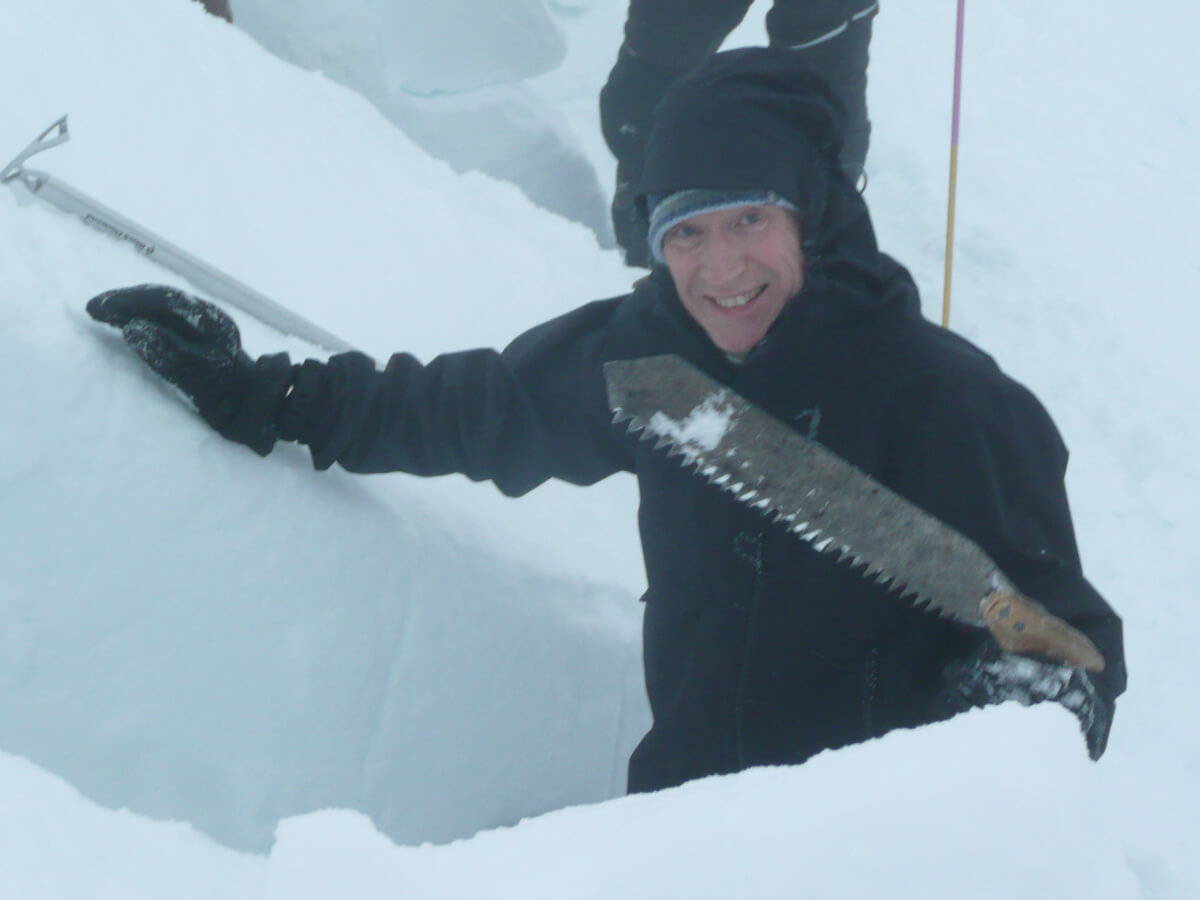
When it comes Scottish snow conditions, don’t underestimate how hard the snow can get. You will need a snow shovel with a metal scoop and a good snow saw. The sintering effects of strong sunlight and hard frosts of high pressure can make wind-slab snow astonishingly hard to dig. A good snow saw is often the only effective way to deal with this type of snow.
Many of the snow-hole sites are immediately adjacent to water courses. In addition, the snow pack often lasts well into the summer meaning there’s little opportunity for biological breakdown of human waste. If you do have to go you should do your business well away from the snow-hole site and far more preferably have some system to carry it out. Cairngorm Mountain’s Snow White Project has greatly improved the situation at the Cairngorm sites. All snow-holers coming to the Cairngorms are encouraged to use it.
The safety of a snow-holing in Scotland is often a reflected by the time it has taken to dig. I’m cautious about suggesting how long digging should take as it depends on a number of factors, not least the condition of the snow. From a “duty of care” perspective I feel a large communal snow-hole is much better than several separate small ones. I normally anticipate spending 4 to 5 hrs digging a 4 plus person snow-hole. I accept in soft snow conditions that this can possibly be shorter for a fit party of 2 each digging their own entrance.
With the vagaries of the winter weather, if done correctly Snow-holing is often the far safer option compared to a tented high camp in Scotland’s Winter Mountains.

* Andy holds the WML and IML awards and has over 20 years Mountain Leading experience. He has guided well over 30 commercial snow-holing trips in this time and although none of the mountaineering qualifications have a remit that covers snow-holing, he is one of the few guides deemed competent by HSE criteria of “relevant experience” to run snow-holing trips.
** British Antartic Survey helped in a BSc thesis. Available on request from andrew@scotmountainholidays.com
Medical references:
www.ncbi.nim.ni.gov/pubmed/18665947
www.ncbi.nim.ni.gov/pubmed/9340627
www.ncbi.nim.ni.gov/pubmed/8355417
www.ncbi.nim.ni.gov/pubmed/15265339
The Scottish mountains in winter are beautiful and challenging. They draw walkers and climbers from across the UK and beyond. However, their snow-laden slopes demand respect and a solid understanding of winter skills. Among these, the ice axe arrest is one of the most essential techniques, potentially saving lives if executed correctly.
An ice axe arrest is used to stop an uncontrolled slide on snow or ice. Whether you’ve slipped while traversing or taken a tumble down a steep slope, this skill can prevent a minor mishap from becoming a major incident. Here’s a step-by-step guide to mastering it:
1. Start with the Right Equipment
Ensure you have a proper walking ice axe suited to your height and activity. Keep it readily accessible, especially when on or near a steep, snow or ice covered slope – not stowed away in your rucksack!
2. Practice on a Safe Slope
Choose a gentle, snow-covered incline free from rocks and other hazards. Practicing in a controlled environment builds confidence and muscle memory.
3. Position and Grip
Hold the axe in your uphill hand, with the pick facing backward. Your other hand should cradle the shaft just below the head. This grip ensures you’re ready to arrest at a moment’s notice.
4. Execute the Arrest
If you start sliding:
*In the early days of running Fraoch Lodge, we hosted someone who was unfortunate enough to catch a crampon point when descending from a climb in the northern corries of Cairngorm. He ended up in Raigmore hospital with several fractures in his leg. (He wasn’t in once of our guided groups.)
5. Practise Different Scenarios
Slips can happen in various positions – feet first, head first, on your back, or on your front. Rehearse them all to ensure you’re prepared.
Mastering the ice axe arrest is not just about technique but also about practising regularly and understanding the snow conditions. The best way to effectively perfect your technique is to learn the practical skill under the guidance of an expert during a winter skills course. As winter walkers, we must respect the mountain environment and be prepared for its challenges. For a detailed demonstration, check out our accompanying YouTube video where we break down each step in real-time. Stay safe and enjoy the adventure!
Check out our Top Ten Winter Skills tips: https://scotmountainholidays.com/blog/top-10-winter-skills-tips/
Check out more of Andy’s top winter advice tailored for Scottish winter conditions:
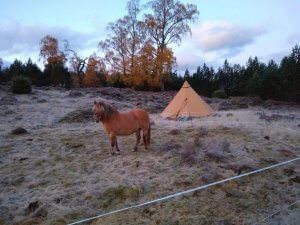
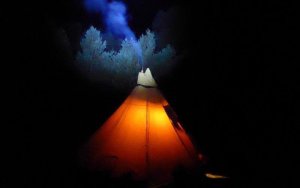
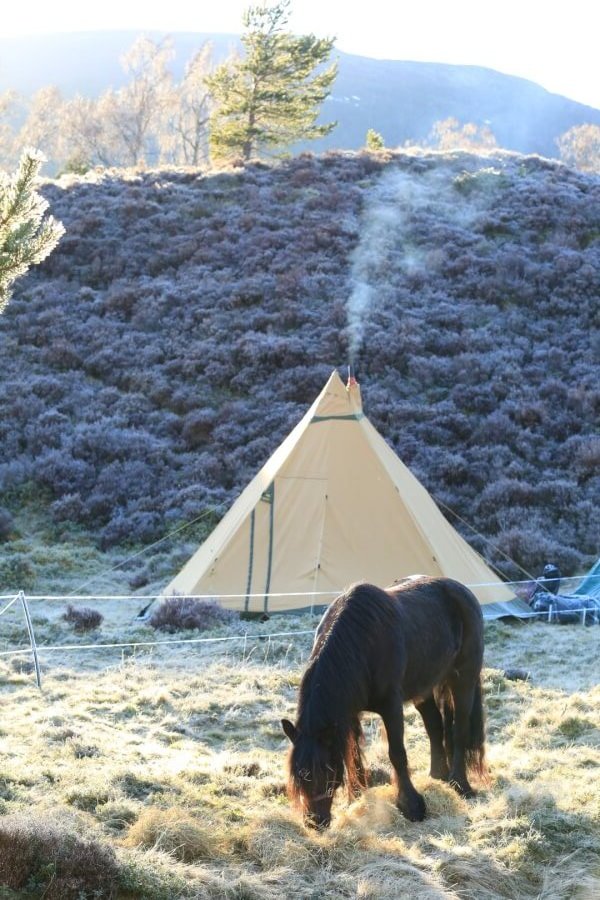
The wild camping, the isolation, the hiking, the heated tipi’s with their innovative ventilation, … We think our Highland Wilderness Glamping Trips are some of the most Covid safe adventure holidays going.
In addition to the measures we’re taking and asking guests to take, here are those measures we are taking with regards to our pack pony supported hiking trips.
Walking is intrinsically much safer since it’s an outdoor activity. Air currents disperse droplets and aerosols quickly. Additionally the movement involved in the activity further aids the process. If social distancing is maintained outdoors, it’s extremely difficult to receive an adequate infectious dose that overwhelms a healthy immune system.
“The risk outside is incredibly low especially if you stay two-metres apart… Droplets fall to the ground quite quickly and aerosols are dispersed by air movements and even more by breezes and winds.”
“outside activities pose very little, if any, risk of new infections“.
“In one Chinese study of nearly 1,300 transmission events, only one occurred outside and they broke social distancing rules,”
Keith Neal, Emeritus Professor of the Epidemiology of Infectious Diseases, University of Nottingham
Additionally, in a Downing Street briefing, Jonathan Van-Tam, the Deputy Chief Medical Officer for England said:
“there is a definite truism across all of the science literature that ventilation is a most critical part of reducing transmission from respiratory viruses”.
“[normal breezes and air currents appeared to quickly disperse] any kind of plumes of anything. So from that perspective, it is absolutely categorically clear that outdoor spaces with higher degrees of ventilation are less problematic environments for transmission than indoor spaces.”
This is also a lot easier in the outdoors. We ask guests to observe 2 m social distancing and to have a face covering at hand should it be quickly needed. A Buff is ideal. “Close contact” is defined as spending 15 minutes within 2 meters of an infected person.
When we talk about “close contact” it’s important to point out that we’re not looking for people the person may have passed on the street or in a shop, as the risk in these situations is very low. A close contact involves either face to face contact or spending more than 15 minutes within 2 metres of an infected person.
Nick Phin, Public Health Matters Blog, Public Health England.
It’s were there is appreciable risk of you taking onboard an adequate viral dose for your immune system to become overwhelmed and hence become ill.
If we do come across other people on the trail our passing is only momentary and it doesn’t qualify as “close contact” The risk in this regard is very small.
We will be passing through gates, etc on the hike so we ask guests to carry their own bottle. Due to the large number of local whisky distilleries we have no problem sourcing hand sanitiser! We have a very large container of it at base to refill your dispenser/container.
We have always tended to head to the quieter areas as we are likely to see more wildlife. Our Highland Wilderness Glamping Covid safe family adventure trips are no exception. The Scottish Highlands are one of the least inhabited areas of Europe. With an average population density of 9 people per square km, they are comparable only to northern Scandinavia. This compares to an average of 400 people per square kilometre in England. The distribution is far from even, creating huge uninhabited areas! If you know where to go it’s quite easy to avoid people.
With all the major Scottish cities being more than 2 hours drive away and with so much countryside, it isn’t difficult to escape up here in the Cairngorms. One of the main ideas behind this concept is to camp in comfort in some of the most beautiful, remote and secluded locations. Our overnight wild camp is reached by leaving the trail and picking up the faintest deer trail! We can pretty much guarantee we will have the location to ourselves!
We think a large Tentipi heated with a woodburner, provides a covid safe environment to socialise. Here’s why:
Social Distancing:
With over 23 square meters of floor space in our Tentipi Safir 9’s, it’s possible to seat 6 people and still maintain 2 m social distance! Yes, a hexagon with 2 m sides will comfortably fit inside an octagon with 2.1m sides!
Covid safe ventilation:
As previously stated ventilation is the key in reducing the chance of transmission. One of the design characteristics of the Tentipi (Nordic Tipis) is their ventilation. Designed to accommodate an open fire, intake vents (11 in graphic) around the base of the Tentipi allow air to flow into the tent while ventilation in the apex (9 & 10 in graphic) allows smoke to escape.
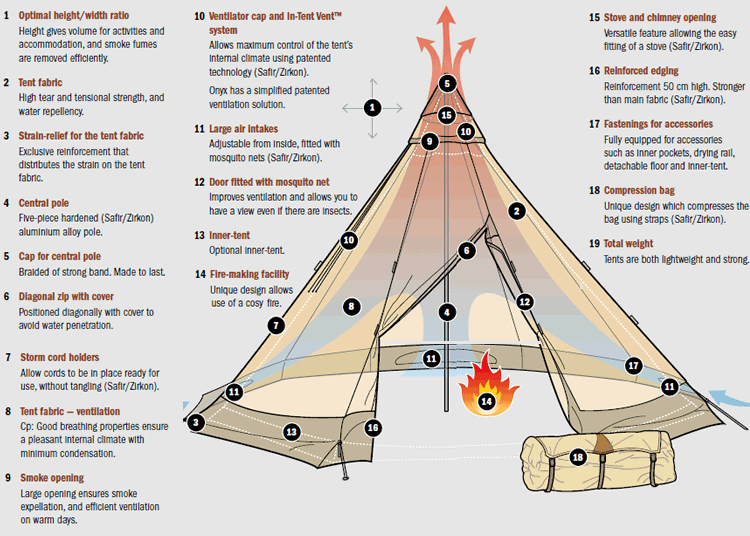
During summer months this ventilation happens passively as a greenhouse effect develops within and the warmed air rises. The woodburner running enhances it greatly.
An additional effect of warming the air is the drop in its relative humidity. This potentially has positive implications with respect to airborne transmission. There is presently some debate as to the role of airborne transmission. In dry air aerosols (less than 5 microns) can evaporate very quickly, in less than one-tenth of a second! This drying process potentially damages the virus preventing it being infectious i.e. it disinfects.
The portable woodburner sits in the centre of the Tentipi with the flue rising 3.1 meters to the apex. Further heated by the flue increases airflow and reduces relative humidity. Sitting 2 m apart around the stove, expired air drifts up and out of the top vents.
The main tent fabric is an impregnated polycotton canvas and is hence breathable. The benefits are 2 fold. In combination with a heat source (camp woodburner) it helps dry the air for the benefits explained above. Secondly it is a porous service;
Preliminary research published in The New England Journal of Medicine indicates the virus doesn’t survive on porous surfaces for more than 24hrs. Porous surfaces, like wood, cardboard and natural fabrics are thought to have a dehydrating effect on the virus.
The same research found the virus may remain viable on plastic (polypropylene) and stainless steel (AISI 304) for up to three days. On copper, well known for its antimicrobial properties, it lasts for no more than four hours.
To be on the safe side though our approach is to simply air the tent for 72 hours between groups.
A wet cloth and soap solution cleans the groundsheet at the end of the evening. Yes, soap is a disinfectant! It works by breaking up the exterior cell wall of SARS-CoV-2, the virus that causes Covid-19.
We make the simple rule that each household sleeps in separate tents on this covid safe adventure.
Each Exped Deep Sleep System comes with its own pumpsack. Whilst on the move this acts as a stuff sac keeping everyone’s bedding separate. Come the end of the trip, camp sheets, pillow cases, duvet covers and pump-sacks are laundered in the normal way. Sleeping mattresses, duvets and pillows are cleaned and not used for 72 hours.
“In general, because of poor survivability of these coronaviruses on surfaces, there is likely very low risk of spread from food products or packaging.”
Centres for Disease Control and Prevention, USA Government
“Although it is very unlikely that COVID-19 is transmitted through food or food packaging, as a matter of good hygiene practice anyone handling food must wash their hands frequently with soap and water for at least 20 seconds.”
Guidance for food businesses on coronavirus (COVID-19), UK Government
In addition to general good hygiene as above, guides preparing food for the group will wear a face covering. With a hot camp wood burner sterilising the Stainless Steel eating utensils is easily.
Depending on the number of households involved we are accepting a maximum of 4 to 6 guests on these covid safe adventure trips.
As previously stated, research has found the virus doesn’t survive beyond 72 hours on any surface. In addition to doing the regular cleaning we leave 72 hours between trips to add an extra level of security.
We hope you agree our Highland Wilderness Glamping Trips provide a covid safe family adventure.
Whatever winter sport is your passion, getting the most out of the UK winter season is inevitably about being opportunistic. You need to jump to it when the conditions are right. Getting into the hills requires some degree of planning. You need to learn all the tips you can on about how to forecast snow. When forecasters tend only to predict 3 days in advance, it doesn’t give much time to get organised.
Season passes have been released by Cairngorm Mountain and quite possibly the other ski centres across Scotland. Now’s the time to keep your eye out for the snow predictions.
This changes though when you understand atmospheric thickness and how it relates to the 5 day synoptic weather charts. Have you ever noticed those numbered dashed lines hiding behind the isobars? (see below – on Bracknell charts predicting 36 hrs or more ahead) Well they represent the thickness of the atmosphere and this directly relates to the temperature of the air-mass. Bear with me, here’s the techie bit.
Air pressure at sea level tends to equalise at around 1000mb. The colder the air, the greater the density and hence you need less of it volume wise to create that 1000mb pressure. Therefore the atmosphere is thinner at the poles than it is at the equator. Meteorologists have realised that by measuring the altitude at which the air pressure halves (i.e. is 500mb) they can plot the movement of cold air from the polar regions towards the equator. In the northern hemisphere these thickness lines represent the southern limit of cold air moving down from the north.
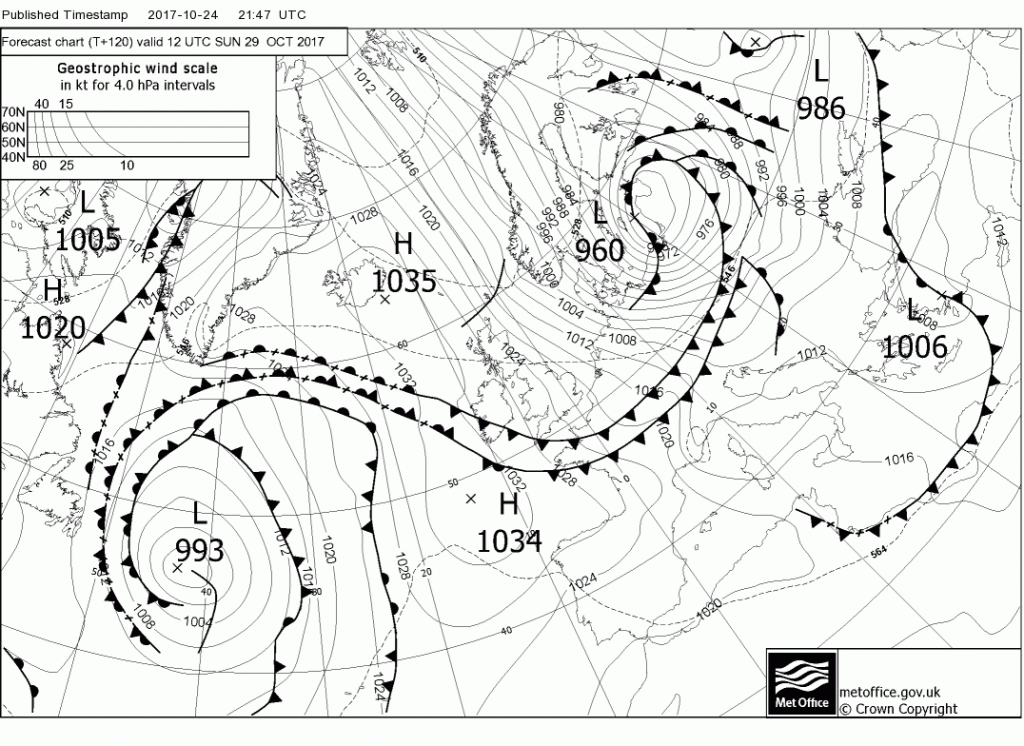
As far as wintry weather in the UK’s mountains is concerned it’s the 528 line (equates to 5280m) you want to watch out for. When it crosses the UK you can expect snow on the hills at least. They are a bit like contour lines. The closer together they are the more the marked the temperature change but if, lets say, the 528 line is 300 miles out to the west over the Atlantic you might be at least be expecting snow on the highest tops in Scotland. If the 510 line approaches the UK wrap up warm, very warm! The charts predicting the arrival of the “Beast from the East” had the whole of the UK enveloped beneath the 510 line!
For those of you who can jump to it and might be in need of accommodation in the Northern Cairngorms area check out Fraoch Lodge.
Every year there are reports of people getting lost in the snow and ice of winter. Mountain rescue callouts are predominantly about navigation errors. To make winter a safer place, it is a good idea to book a guide to lead or alternatively join a group heading out into the hills. Some groups are organised by companies on commercial trips, others are groups of friends or clubs. Nonetheless there is safety in numbers.
Every year there are winter wilderness expeditions running under the guidance of Andy Bateman of Scot Mountain Holidays in the Cairngorms and Glen Affric. There’s also usually a trip to Knoydart, home to Britain’s most remote pub; however there is a major reforestation project going on there this year which makes it less attractive to visit and all the accommodation will be taken by the forestry workers.
Life will be reduced to basics during the expedition and the only concerns will be: eat – sleep – hike (repeat). The perfect way to clear the mind and return feeling completely refreshed after only a few short days.

This is a rare opportunity to experience one of the remotest parts of the Cairngorms National Park at a time when the mountains are probably at their most glorious. The High Cairngorms are renowned for their wintry conditions yet at this time very few folk dare to do multi-day trips
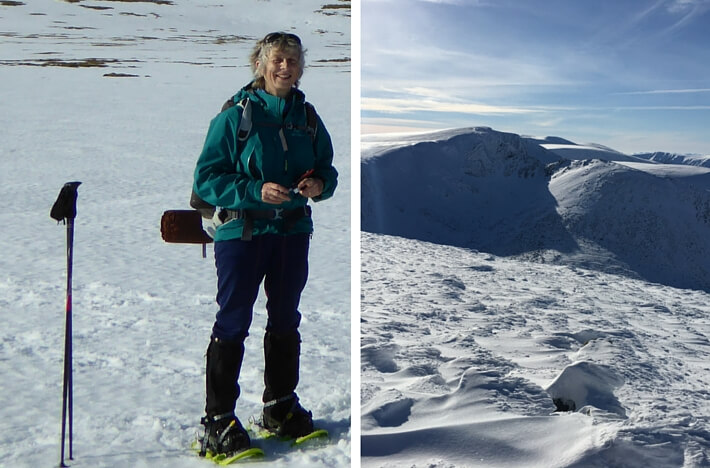
Celia enjoying her second (or third) winter expedition with Scot Mountain Holiadays
Highlights: winter skills, Monadh Mhor (Munro), Devil’s Point (Munro) Carn a’ Mhaim (Munro), Derry Cairngorm (Munro), Beinn a’ Chaorainn (Munro)
Price: £ on application
Email: SCO@scotmountainholidays.com for full information about this trip.
MINIMUM GROUP SIZE: 3 PEOPLE – Private dates available. Please enquire.
This is Scotland’s ultimate winter mountain journey. The high “plateau” route takes in Britain’s 2nd, 3rd, 4th and 5th highest peaks on a journey that circumnavigates Scotland’s finest and best known mountain pass, the Lairig Ghru.
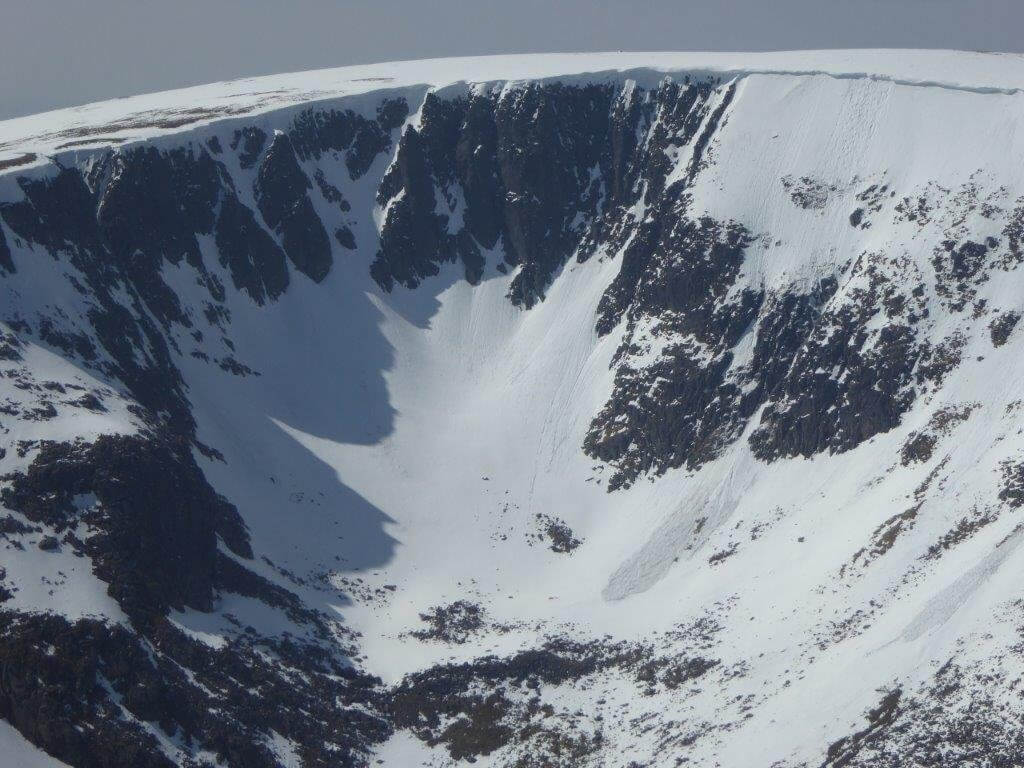
Check out the potential avalanche sites on the head wall. You can see how the corrie came to be made
Highlights: winter skills, Cairngorm (6th Highest Munro), Ben Macdui (2nd Highest Munro), Braeriach (3rd Highest Munro), Cairn Toul (4th Highest Munro), Sgor an Lochain Uaine (Munro)
Price: £ on application
Email: CWO@scotmountainholidays.com for full information about this trip
MINIMUM GROUP SIZE: 3 PEOPLE – Private dates available. Please enquire.
Imagine the soft orange light of a winters dawn gleaming down from the snowy celestial heights. Surrounded by snowy peaks and cradling a mug of tea in the crisp air, indeed a stunning winter’s day beckons.
Highlights: winter skills, Mullach Fraoch – choire (Munro), Mam Sodhail (Munro), Carn Eighe (Munro), An Socach (Munro), Carn a’Choire Ghairbh (Munro)
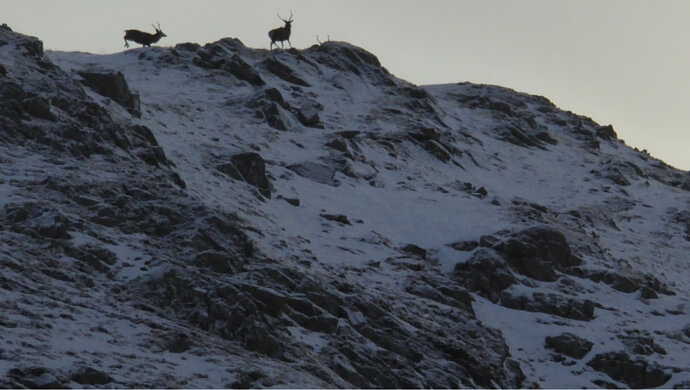
Spotting deer in Glen Affric while on winter expedition in Scotland
Price: £ on application
Email: Shangri-La@scotmountainholidays.com for full information about this trip
MINIMUM GROUP SIZE: 3 PEOPLE – Private dates available. Please enquire.
Or for something slightly different
“Porridge with whisky at 9am whilst warm & dry in my sleeping bag has never tasted better!” Ric Taylor,Bristol.”
Have you ever dreamt of taking a short walk amongst a moonlit snowy wonderland. Amazingly no need for a torch! Imagine reflected flickering candle light giving way to the soft light of a winters dawn as you emerge from you snowy abode. Not a soul about! We’ll have a vast pristine winter wonderland all to ourselves. It’s a remarkable experience.
Highlights: winter skills on Cairngorm, overnight expedition to sleep in a snow cave, creation of said snow cave
how to build a snowhole in Scotland
All digging and cooking equipment supplied by your hosts, Scot Mountain Holidays.
Check full details on the website
Highlights:
Accommodation: Barrisdale Stable (if available) or heated Tentipi
MINIMUM GROUP SIZE: 3 PEOPLE – Private dates available. Please enquire.
Highlights:
Accommodation: Barrisdale Stable (if available) or heated Tentipi
MINIMUM GROUP SIZE: 3 PEOPLE – Private dates available. Please enquire.
Horse welfare: When we conceived the idea of our Highland Wilderness Glamping trips, our primary concern was the welfare of the ponies.
This aspect should quite rightly be a consideration for anyone planning to book an adventure trip involving animals. There’ve been plenty of examples where animal welfare could have been better on adventure trips, both at home and aboard.
Putting aside our own personal wishes that they should be happy, pony welfare needs to be a top priority if you’re going to have a safe and sustainable business. A happy pony is a safe pony.
There is some confusion in terms of what constitutes good practical pony welfare. Our approach is a pragmatic practical one based on experience and not on any idealism.
Firstly, our ponies are inspected by the Highland Council appointed Vet as part of a local riding centres yearly inspection. By law there is now a strong animal welfare element to this inspection which is connected to the granting of the licence to operate as a pony trekking centre.
When we started to put these trips together we approached Highland Council to make sure we were on their radar, that they were happy with our plans and comfortable with us being inspected as part of a local riding centre.
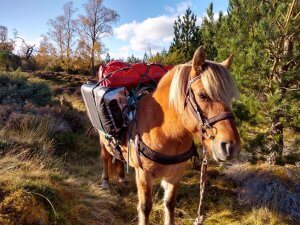
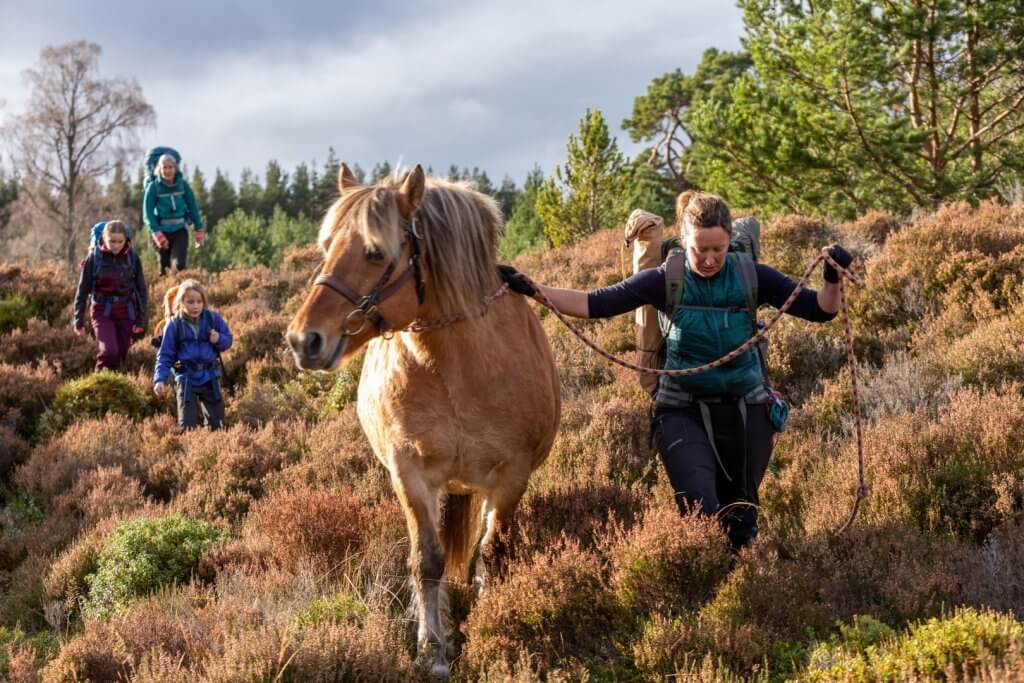
We use both the Highland and Fell Ponies. Both are British mountain/moorland breeds and are noted for their hardiness, strength and surefootedness. With their relatively short backs both breeds are well adapted to carrying loads. In fact the Fell Pony has a long history of being used as a packhorse, possibly dating back as far back as Viking times. They are good fast walkers.
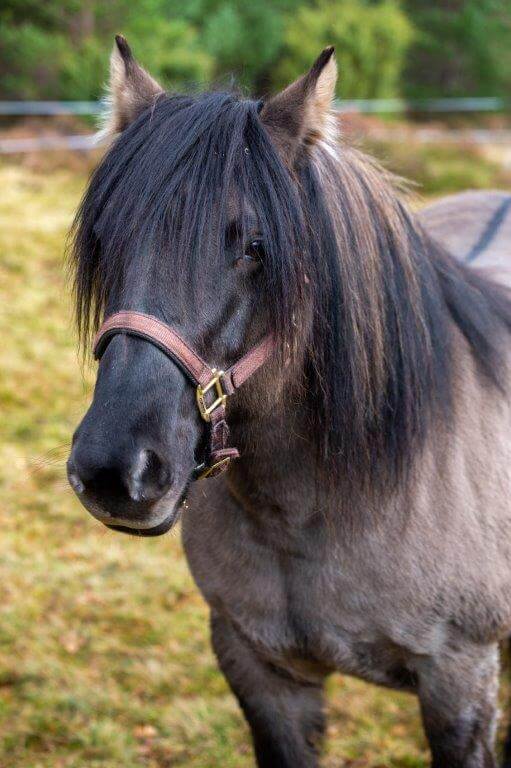
The Highland Pony has been developed in the Scottish Highlands as a work horse. They are stocky and very strong and are quite able to live outside throughout the harsh Highland winters. Their thick winter coats are so well insulated that it’s not unusual for snow to lie on their backs! They are still regularly used to bring culled deer down off the mountains.
They are well adapted to surviving on particularly rough grazing. With this in mind, what they eat does need to be monitored and managed. Leaving them to their own devices in a field of lush grass can be a recipe for disaster. It can quickly lead to them becoming obese and being prone to insulin resistance and laminitis. They do need regular exercise.
In fact, one of the biggest welfare issues at the moment is overweight ponies due to inadequate exercise. Whether carrying riders or packs, this offers valuable exercise and mental stimulation for the ponies. As with humans, an overweight pony puts added wear and tear on their joints as well as potentially developing other health issues.
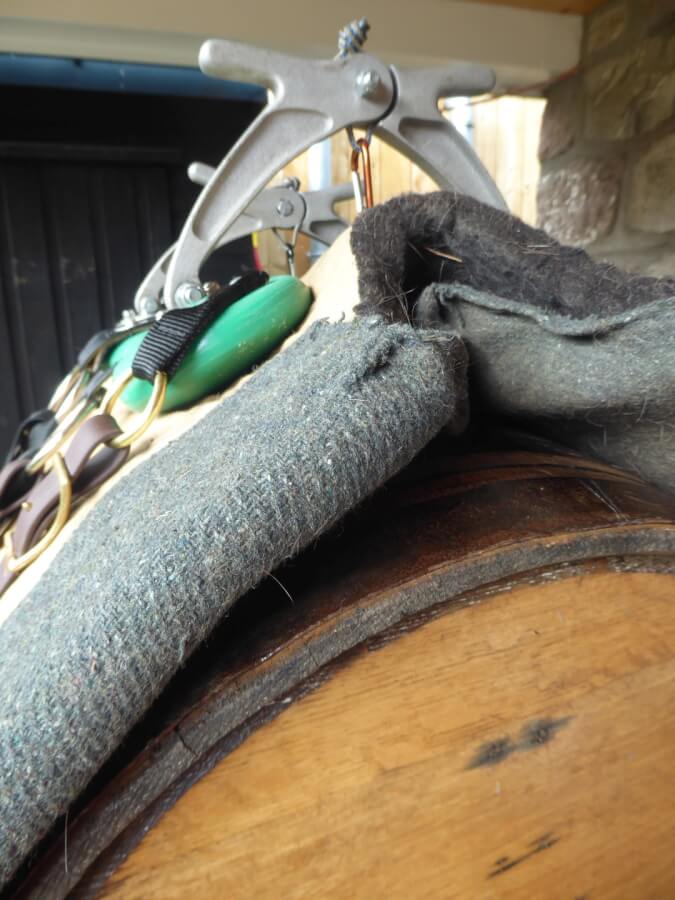
We use Custom Pack Rigging saddles imported from Canada. They are regarded by many in the horse packing world as the finest pack saddles on the market. They differ from the more traditional pack saddle styles in as much the bars pivot on the end of the arches. It means the bars automatically conform much more closely the ponies back shape. The bars are also ergonomically shaped as well as having the option of altering the width of the arches so as to ensure the perfect fit.
The pack saddle sits on top of a pack saddle pad. It’s a 1 inch (2.5cm) thick dense felted wool pad to provide protection for the pony. Its width is 82 cm, the same dimension of the bags we use. The bags are padded out with foam inserts to provide additional protection.
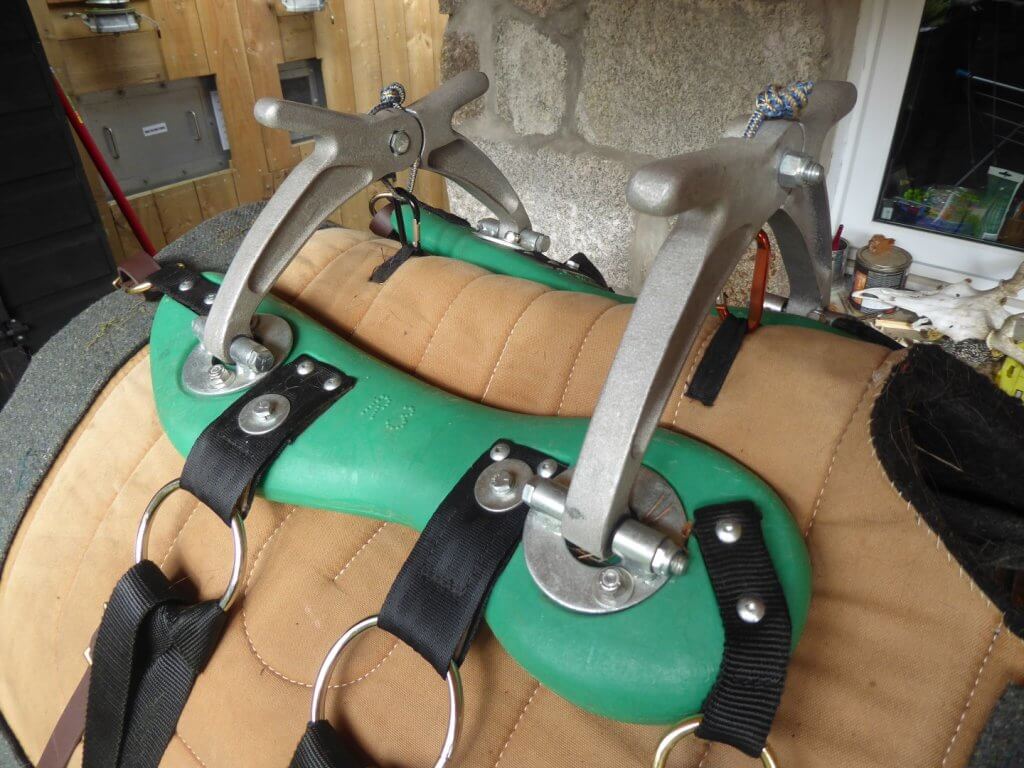
The pad is lined with a wool cover which can be easily removed and cleaned.
The long established golden rule of horse packing is that the ponies carry no more than 15% of the pony’s own body weight. By comparison for riding, the figure is 20% is a human is generally a more dynamic load.
Taking the lower end of the Highland Pony weight range to be 500 kg this gives a weight of 75kg (just under 12 stone). Excluding the weight of the pack saddle my Highland Pony carries 64kg (10 stone – the weight of a light human)
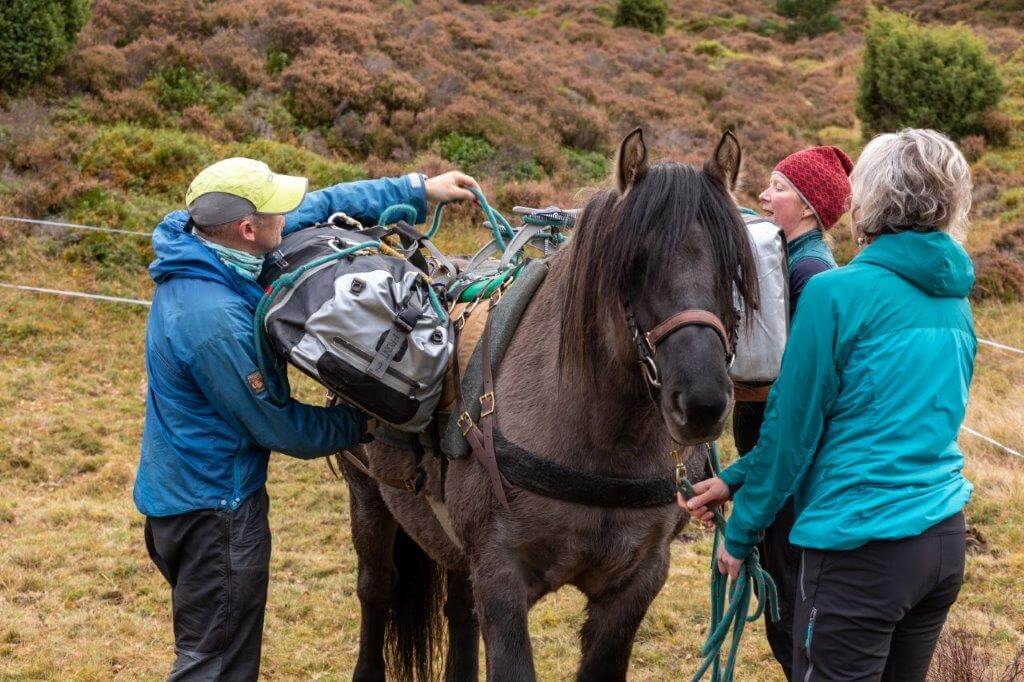
It is very important for pony comfort that the loads on either side of the pony are finely balanced. They need to be within 100 grams of each other i.e. just over 0.15 % of what they can carry. 2 people are involved in securing the bags to the pack saddle to make sure the pony isn’t uncomfortably unbalanced whilst being loaded. The main bags are a maximum of 20Kg each to both be manageable and to fit in with lifting regulations.
The top load and pannier bags are stabilised using a length of rope and a triple diamond hitch and a second girth.
Common to British mountain/moorland pony breeds, Fell and Highland ponies are intelligent. They have a good sense of self preservation that comes from their ability to survive the harsh upland climate. They are able to convey their feelings and as owners we are able to interpret their behaviour. Highland and Fell ponies are not dumb!
If a pony doesn’t take well to the pack saddles, we don’t use them. It’s as simple as that. Goldie is a case in point. We also always take 2 ponies so they have each others company, they are after all a herd animal.
Nothing about mountain navigation is rocket science. Then again it is not a god given talent either. It does though require both a good understanding and the right approach to deal with the worst conditions in the mountains.
In good conditions with good visibility you can quite successfully navigate without reaching for your compass. Neither will you need to resort to the “dead reckoning” techniques of timing and pacing to gauge your distance. By relating the features on the map to those on the ground you can safely get to your destination. Some of those features will be man-made like field boundaries. Other more obvious natural features include streams or ponds or lakes. But many of those features, especially in Scotland, will be made up of a combination of a change in gradient and a change in slope aspect (which way the slope faces).
Take a little rounded hill (knoll) for instance: as you rise up onto it the gradient will increase before flattening out on the summit.The gradient then increases again as you drop down the other side. It will be shallower again at the bottom. If you were to walk around its flanks you would continually experience a change in slope aspect. If we think about other features like ridges, spurs, valleys, gullies, saddles, etc, they’re all a combination of changing gradient and slope aspect. Both slope aspect and gradient are indicated by contour lines.
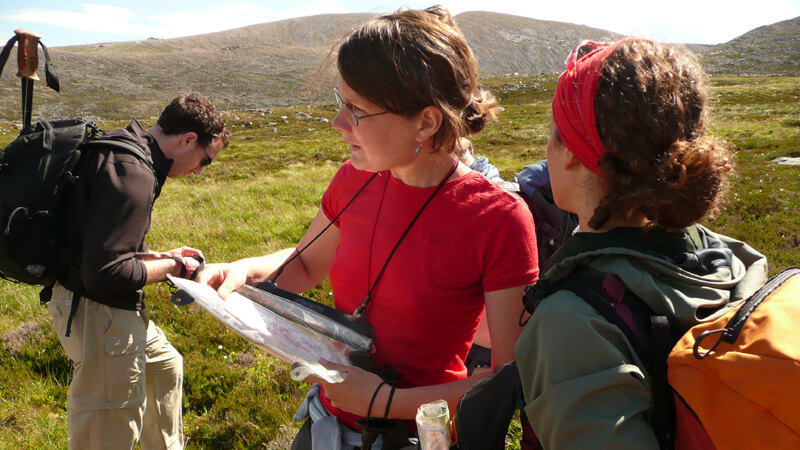
Map reading in the Cairngorms
Accuracy in a particular skill is important. However the key aspect of accurate Mountain Navigation is your ability to manage error. It’s a fatal mistake rely too much on the absolute accuracy of a few skills. Don’t ignore the importance of applying techniques or strategies that reduce or negate the effect of error. If we think how most folks get lost on the mountains it’s when they are trying to navigate to a point beyond their range of visibility. One strategy is to keep your navigational legs short. A 10% error in distance or direction over 2 km will be 4 times that over 500m. But if we are to do this we will need to be able to identify more way-marking points. This, especially in Scotland, often comes down to contour features.

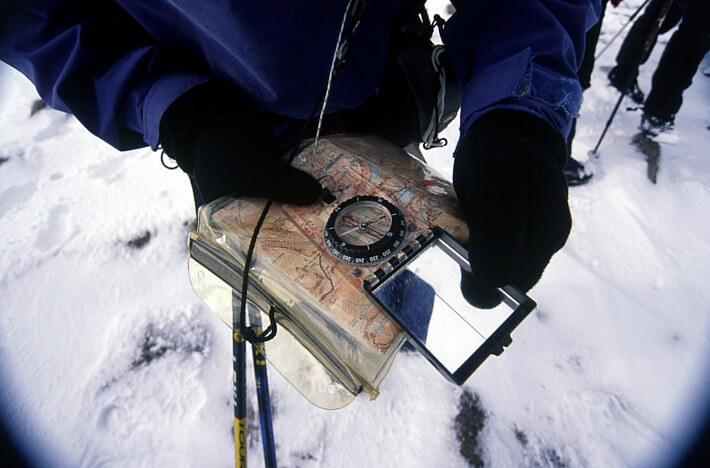
Dachstein mitts don’t necessarily mean that you won’t be able to use a compass or to navigate, as shown by our director Andy Bateman
In winter whiteout conditions where you are, let’s say making a descending traverse, where you have no horizon and loose the definition of slopes and other features, it can be very difficult to stay on a compass bearing. But again it may be a change in the gradient or slope aspect which maybe the first (and maybe only) indication that you have drifted off your compass bearing. Bad visibility of course encourages you to abandon any attempt at interpreting the lie of the land. This is the last thing you want to do and it’s even more important that you keep a close eye on the terrain.
Test your limits, within your means
It all comes back to you contour interpretation. This is the crux of good mountain navigation and around which all the other navigational skills like compass bearings fit and relate. Of course this all makes perfect sense when you consider, by definition, mountains are composed of slopes and in turn those slopes must have an aspect and gradient. It is very important that all the various navigational skills and techniques are related to each other and not taught in isolation. One of the common points of failure on Summer ML assessments is when candidates place an over reliance on compass bearings and timing and pacing techniques and don’t develop their contour interpretation skills. Your “dead reckoning” skills are of course important and you would never be without you compass on the hill but they are in effect auxiliary skills, albeit very important ones, to your contour interpretation.
Andy Bateman, Scot Mountain Holidays, 26/3/15. (updated 14.01.2020)
Mountain Navigation by Peter Cliff:
Weather for Hillwalkers and Climbers by Malcolm Thomas
Mountaincraft and Leadership by Eric Langmuir
Hillwalking the official handbook of the mountain leader by Steve Long
Winter Skills: Essential walking and climbing techniques by Andy Cunningham
Useful links:
Mountaineering Council of Scotland:
British Mountaineering Council:
British Association of International Mountain Leaders:
Mountain Training Association:
Having delivered navigation courses for the last 20 years here are Andy Bateman’s top tips and strategies.
It’s always struck me that describing winter mountain navigation as a bit of a “black art” isn’t a particularly helpful phase for anyone trying to get their head around the subject. Dealing with even the worst of winter white-outs isn’t rocket science but it does require the right approach, mindset and plenty of practice. Here are my top tips:
Of all the mountain navigation techniques and skills, contour interpretation is the most stand alone skill. In fine conditions it’s quite possible to get you to your objective without the use of any another technique. It should be the central pillar of all serious mountain navigation courses with all other skills and techniques relating to it.
Contour interpretation gives you your direction and distance. Where ever you are in the world, by definition mountains will always have slopes. Slopes have a gradient and an aspect, both of which are denoted by contour lines. Changing gradient and aspect combine to form many of the terrain features like ridges, valley’s, knolls, spurs etc. It’s by relating our position to these on a navigational leg that gets us to our destination. Also when things don’t go quite according to plan, its the terrain that may well indicate what “plan B” should be.
Seek out well defined but small contour features. Look for abrupt changes in either the spacing between the contour lines or abrupt changes in the direction of the contour. If both come together at the same point, fantastic! This well defined feature may well be discernable on the ground and it’s small size will help to pinpoint your position. Being able to recognise a good contour objectives in this way is an important skill. On navigation courses I often recommend guests take themselves onto a hillside and rather than aiming for the summit, practise seeking out these type of contour features.
Although vitally important in winter mountain navigation, compass work, dead reckoning techniques (timing & pacing), etc should serve to back up your contour interpretation in poorer conditions but never replace it!
Don’t let the conditions dissuade you from monitoring the terrain. Putting aside blowing snow, have you ever paced out the visibility in a winter whiteout? The actual visibility is often better than it appears. The lack of definition due to everything being white and the flat light, is often mistaken as bad visibility. Although often not great, quite frequently visibility will be 50m or more. 50m one way and 50m in the other direction gives you a span of 100m. If you’re on top of other aspects of your mountain navigation it can still be enough to monitor you position in relation to the terrain. In bad conditions it’s even more important that you are interpreting the contours.
Micro navigation in winter
Making a diagonal descent across a snow and ice covered slope with a strong cross wind, in a whiteout is going to challenge even the most experienced winter navigator to stay on his/her bearing. It’s changes in gradient or slope aspect that might be the only indication that you have you’ve drifted off your bearing or maybe gone too far.
Think about putting your crampons on when employing dead reckoning techniques. The last thing you want is to find you are unsure of your footing half way though your pacing or timing. It can be very disruptive. Get to know how wearing crampons effects your pacing and speed.
Navigational accuracy operates at 2 levels; firstly, accuracy in any particular skill or technique, and secondly, what could be referred to as “error management”.
There are well recognised techniques like: aiming off, attack points and collection features. Each of these techniques either corrects or negates accrued error.
Employ a number of techniques simultaneously so to avoid being dependent on the absolute accuracy of any one particular technique. If you’re properly monitoring gradient, slope aspect, features, distance and direction during a navigational leg you hopefully won’t go too far wrong.
Keep your navigational legs to below 1 km. A 10% error in distance or direction over 2km is going to be 4 times that compared with that over 500m. The more contour features you can identify, the more waypoints you have and hence the shorter your legs can be. It all goes back to the contours!
Be wary about navigating to water features in winter. Stream channels often fill with snow leaving no surface indication of their presence. Shallow Lochans, lakes and ponds readily freeze solid and won’t sink when loaded by further snowdrifts leaving us without even the luxury of flat surface. The shallow margins of deeper bodies of water can behave similarly thereby reducing their apparent size. Some lakes freeze over and the remaining water drains out. The unsupported ice, which may be buried by snow, then warps and takes on the form of the undulating lake bed again robbing us of any indication of the lakes position.
At the end of a navigational leg make sure you’re definitely at your intended objective. Reassess your timing and pacing. Snow conditions can change within a matter of hours. Was your estimated speed correct or did that unexpected patch of deep soft snow you just had to plough through slow us down? How does the terrain look? The next leg may well accrue a little error. You don’t want to compound the situation by transferring error from you last leg to it.
Keep mental arithmetic to an absolute minimum
Use the romer scales on your compass base plate. Mental arithmetic is easily done in indoors but it can be a whole lot more difficult whilst being battered by high winds and sub zero temperatures.
Available for purchase (£5)
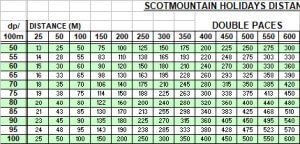
Use a time-pace matrix with pre-calculated times and double pace figures. The more comprehensive the better! Aside from increasing accuracy, a very detailed matrix affords you the ability to compare values of similar double pace rates or speeds for the leg distance. The difference between similar values in effect indicates an acceptable range of error relative to the length of the leg. You can then use this to compare with what other techniques are indicating. – an additional powerful navigational tool!
Use some method to count paces. You will have other thinks to keep an eye on and there is always a chance of an interruption. It’s easy to loose count. Using the traditional cord with toggles on the rucksack strap keeps your hands free.
Your brain is your most important navigational ‘tool’ so plan regular short breaks to keep it well nourished with food and drink. I find 80 mins of walking followed by a 10 minute break generally works well. A stop of this length is quickly used up to adjust clothing, eating, drinking, etc, but more than this and you will start to chill quickly.
If you’re cold, stop and do something about it. Don’t necessarily wait for the next ascent to warm you up. A resultant lack of resolve to make sure things are right may lead to a navigational error that leads to a much greater delay.
Make a rough estimation of what your bearing will be before you take it. This will help to guard against making simple but easy mistakes. NE bearing will be around 45 degrees plus or minus 22.5 degrees. 22.5 degrees is the difference between NE and ENE. If its S it will be around 180 degrees, W 270 degrees and so on …
You may well have to opt for less ambitious objectives than you might normally do in the summer. The available daylight will be less. The conditions, the wearing of crampons and the carrying of a heavier pack makes for a slower pace. You will invariably have to make more stops to; check the route, put crampons on & off, etc. than compared in winter
The route you take may have to be less direct to take in more and better defined way-points.
When planning your route take into account avalanche hazard. No only do you need to consider whether the terrain you cross may be prone to avalanches but whether you may be crossing the run out zone for avalanche prone terrain above. The earlier you start incorporating avalanche hazard evaluation into your route planning the better.
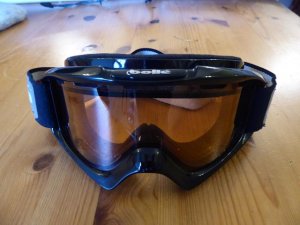
Invest in a good pair of snow goggles. You can’t afford to be without your vision. Even snowflakes hitting your eyes on relatively light winds can be particularly uncomfortable. Trying to navigate into the teeth of a 30mph blizzard without eye protection is purgatory. In the bad conditions sunglasses become useless. Adequate eye protection is an absolute must.
Don’t skimp on this thinking it’s just for emergencies. The challenges of navigating high in the mountains after dusk can increase substantially. A strong beam can really help. During the winter months the chances of finishing the day in the dark increase substantially.
These can be useful in strong winds or soft snow but don’t allow their use to prevent you from employing appropriate navigational techniques, or for that matter your ice axe. If the compass is in use and you’re frequently referring to the map, etc then your poles are best stowed away.
a) An adequately sized transparent base plate (10cm plus in length),
b) A magnifying glass for examining contour detail
c) Romer scales to help minimise mental arithmetic.
Over the years I’ve had guests turn up on navigation courses with either the wrong type of compass or cheap poorly designed ones. It’s often not until guests start to use them on the navigation courses that they realise their failings. Silva produces good one. Choose yours carefully.
On navigation courses cameras and mobile phones have been the main culprits for interfering with compass needles when brought too close. Be conscious of where these are stored in relation to where your compass is stored and used. Steel components on ice axes & trekking poles can also have an effect. On one navigation course a guest had magnetic closures in the storm flap of her jacket zip!
Guests are often surprised we don’t automatically go for the 1:25 000 maps on our navigation courses. It is down to personal preference but here are 3 points to consider for winter?
A 1:50 000 map has twice as many grid eastings as on a 1:25 000 (2 cm & 4 cm spacing respectively) making it much easier to find an appropriately positioned grid easting when taking a bearing. In most compasses the needle housing is approximately 4cm in diameter, the same as the spacing between grid eastings on a 1:25 000 map. With this scale in bad conditions the lack of eastings can be an irritation when trying to take some N-S-ish bearings. This problem is exacerbated by compasses with small base plates.
The wealth of terrain information e.g. loose rock, heath, etc on some 1:25 000 scale maps tends to obscure the contour lines. In winter this extra surface information is often irrelevant as it’s buried.
By opting for the combination of a 1:50 000 map and an A5 sized map case (Ortleib referred to it as a A5 ‘document Bag’) you’ll find the map far more manageable in high winds. At this scale an adequate area of the map is displayed to avoid refolding the map on the hill but is small enough to conveniently fit in a jacket pocket for easy access whilst being weatherproof in a map case.
Your map case is a means by which you can attach the map to yourself.
Scot Mountain Holidays runs mountain navigation courses throughout the year both as stand alone courses as well as part of our winter skills courses.
A visit to Glenlivet Mountain Bike Centre will take at least half a day, especially if you treat yourself to a bite to eat at the Coffee Still. Let the kids loose on the practice track while you wait for your food as then you can relax and they’ll be happy whizzing round and round.
Distance from Fraoch Lodge: 30 minutes drive
Routes: Red (22km) and Blue (9km)
Cafe: Yes
Toilets: Yes
Showers: No
Bike Wash: Free
Bike hire available: yes


Blue route is ideal for families and even has the unusual feature of starting on a downhill section, followed by a zig-zag climb which is not too difficult to manage before more free flowing downhill track which seems to go on forever. There is one wee steep climbing section in the middle, but you know you’ll be rewarded with even more great cross country downhill track afterwards.

Photo caption: Blue trail, Glenlivet: free flowing downhill on very well made tracks area delight for younger riders. Very few roots to negotiate and few if any areas prone to sticky mud.

Photo caption: The uphill section on the zig zag section of the blue route which offers spectacular views over the wider Glenlivet area.

Photo caption: the Coffee Still is a purpose built cafe and wee store supplying a small selection of emergency biking products. You can purchase coffee, cake and a small selection of very good hot food snacks and light meals from chicken fillet buns to pizzas. The menu is not hugely extensive but what is on offer is extremely well-done and very high quality, using as much local produce as possible.
Practice track
A trail map is available to download or you can purchase an A3 foldable version from the cafe when you are on site.
Afterwards:
Treat yourself to a stop in Tomintoul which is a stone’s throw from the bridge where you turn to head over to the bike tracks.
In Tomintoul you can:
Email us if you think we can help plan your vacation in Scotland – we can hit all the Highland hotspots and include some off the beaten track surprises you might not know about.
For inspiration check out our Pinterest board and our Flickr account.
![]() Scot Mountain Holidays (Ltd),
Fraoch Lodge, Deshar Road,
Boat of Garten,
PH24 3BN
Scot Mountain Holidays (Ltd),
Fraoch Lodge, Deshar Road,
Boat of Garten,
PH24 3BN


All content © Copyright Scot Mountain Holidays 2025
Responsive web design by Summit Web Solutions


